Sunday, March 31, 2019

These three A2 size cards feature the February 2019 Paper Pumpkin Kit Grown with Kindness from Stampin' Up!

This is Part 5 of a 5 Part Series.

Link to My Stampin' Up! Store

All three of these cards feature the Cup stamp mounted on Embossed Backgrounds and Die Cuts.  The Cups were stamped in Memento Tuxedo Black Ink, colored with Stampin' Blends and then fuzzy cut.

For this first card I used the Night of Navy and Old Olive Stampin' Blend Sets to color the Cup.

I used Blueberry Bushel CS for the bottom mat and also cut the sentiment from the same paper using the Celebrate You Thinlits Dies.

The top mat is Old Olive CS and was embossed using the Country Floral Embossing Folder.

I cut a Doily out of Whisper White CS using the Doily Builder Thinlits Dies.

The layers were all attached using Tape Runner, but I popped up the Cup using Dimensionals.


For this second Card I used Mossy Meadow and Cajun Craze Stampin' Blend Sets to color the Cup.

I used Pear Pizzazz CS for the bottom mat and to cut the frame piece using two of the Stitched Seasons Framelits Dies.

The top mat was cut from Cajun Craze CS and embossed using the Subtle Embossing Folder.

The sentiment was stamped in Cajun Craze ink on a scrap piece of Pear Pizzazz CS using a stamp from Dragonfly Dreams stamp set.  The outside frame for the sentiment was cut from Whisper White CS and the 2 pieces were taped together using Tear & Tape Adhesive strips.

The Background piece behind the Cup was cut from a scrap Whisper White CS using the Eastern Medallions Thinlits Dies.

The layers were all attached using Tape Runner, but I popped up the Sentiment and the Cup using Dimensionals.

For this third card I used Balmy Blue, Old Olive and Soft Suede Stampin Blend Sets to color the cup.

I used Pear Pizzazz CS for the bottom mat and also used the inside piece that remained when I cut  the frame piece for the card above.  I used one of the Layering Square Framelits Dies to cut a square from the center of the piece.

The top mats was cut from Dapper Denim CS and embossed using the Tufted Embossing Folder.

The sentiment is from the kit and was stamped in Dapper Denim ink and cut using a die from Petals & More Thinlits.

I wrapped 2 pieces of Balmy Blue Organza Ribbon to the ends of the top mat before attaching all the pieces together using Tape Runner, though the cup and sentiment were popped up with Dimensionals.

I finished all 3 cards by attaching some Rhinestones.
These three A2 Size cards feature the February 2019 Paper Pumpkin Kit, Grown With Kindness from Stampin' Up.

This is Part 4 of a 5 Part Series.

Link to My Stampin' Up! Store

All 3 of these cards feature the YOU picture from the kit.  And I chose to make the cards pretty much as suggested in the kit with the exception of color scheme and sentiment.


In each case I began by attaching with Tape Runner the picture to the Basic Gray Mat that came in the kit, centering the 2 pieces.

The sentiment I choose to use was the Celebrate die from the Celebrate You Thinlits.

This top card was mounted on Lemon Lime Twist Cardstock and the die was cut from the same color and mounted to above the word YOU on the mat.


I used Fresh Fig Cardstock for the bottom mat and die cut for this second card.


And used So Saffron Cardstock for this third card.

I finished off each of the cards by adding 3 Rhinestone in the bottom right of the card front.


Saturday, March 30, 2019

These three A-2 size cards feature the February 2019 Paper Pumpkin Kit Grown with Kindness from Stampin' Up!

This is Part 3 of a 5 Part Series.


These 3 cards were created using the cup pictures  that came with the kit.  

 I cut the picture for this card to 3-1/4" x 3-3/4".

Then I cut a 2" x 5" strip of Poppy Parade CS,  used the Triple Banner Punch to cut both ends, then cut it into 2 pieces  I used Tape Runner to attach the pieces to the picture as shown.

The sentiment is from the Home To Roost stamp set and was stamped on the picture using Poppy Parade ink.

I attached the picture with the attached banners to one of the Gray Mats that came with the kit, and then attached the mat to a White Card Base and added a few Rhinestones.

This second card is very similar as I used the same color scheme.I cut the picture piece down to a 3-3/4" square.

I used Tape Runner to attach a bottom mat of Poppy Parade CS onto one of the Striped Card Bases that came in the kit. And then attached one of the Gray Mats that came in the kit to Poppy Parade Piece, and then attached the Picture Piece to the center of that.

The sentiment is from the Birthday Banners stamp set and was stamped using Memento Tuxedo Black ink onto a scrap of Poppy Parade CS and then cut out with using one of the Bunch of Banners Dies and was popped up with Dimensionals.

I cut the third picture piece using one of the Stitched Seasons Framelits dies.  

It was matted onto a top mat of Mint Macaroon CS that I embossed with the Tin Tile Embossing Folder.

And then attached to the bottom mat of Shaded Spruce CS and attached to a White Card Base.

The sentiment is from the Birthday Banners Stamp Set and was stamped using Shaded Spruce ink onto a piece of Whisper White CS.  For this card I also used the die a second time on a piece of Shaded Spruce CS and attached the WW inside piece to the Shaded Spruce outside piece and glued it to the top section of the picture.

I added a bow tied with Coordinating Twine and a few Rhinestones to finish off the card.

Friday, March 29, 2019

These two A-2 size cards feature the February 2019 Paper Pumpkin Kit Grown with Kindness from Stampin' Up!

This is Part 2 of a 5 Part Series.

Link to My Stampin' Up! Store

These 2 cards were created using 1 of the large succulent pieces that came with the kit, cutting it in half, and using one half on each of the 2 cards.

On this first card the Bottom Mat is Tangerine Tango CS which I embossed using the Subtles Embossing Folder.

I glued the Succulent Piece to the left end using 1/8" border.

The cup from the kit was stamped on Whisper White CS using Memento Tuxedo Black Ink, colored with Pumpkin Pie and Old Olive Stampin' Blends sets, and fussy cut.

I glued the cup on a diagonal to a square piece of Pear Pizzazz CS cut with one of the Stitched Shaped Framelits Dies.  It was glued to a piece of Whisper White CS cut using one of the Scalloped Layering Squares Framelits, and popped up with Dimensionals on the right end of the bottom mat.

I wrapped a piece of the White Twine that came with the kit around the left side of the completed mat and then glued it to one of the Striped Card Bases that came in the kit.

On this second card the Bottom Mat is Rich Razzleberry CS.  

I glued the Succulent Piece to the left end using a 1/8" border

The cup from the kit was stamped on Whisper White CS using Memento Ink, colored with Rich Razzleberry and Smoky Slate Stampin' Blends, and the piece was cut using the large label die from the Stitched Labels Framelits.  I applied 3 Enamel Shapes to the cup.

I pulled a piece of Basic Gray Shimmer Ribbon thru the 2 end holes on the die, and applied some Dimensionals to the back of the piece to attach it to the card front.  The ends of the ribbon were attached to the back of the bottom mat.  I made a small bow for the corner using the same ribbon and attached it with Glue Dots.

The sentiment is from the Best Birds Stamp Set and was stamped using Memento Ink.

The finished mat was glued to one of the Black Card Bases that came in the kit.

I added a few Rhinestones to each of the 2 cards.

Thursday, March 28, 2019

These A2 size cards feature the February 2019 Paper Pumpkin kit Grown With Kindness from Stampin' Up!

This is part 1 of a 5 part series.

Link to My Stampin' Up! Store

These 4 cards were all created using 2 of the large succulent images that came with the kit.  I cut both of them in half diagonally and used 1 half on each of the 4 cards.

Next I stamped 4 images using the Cup stamp from the kit onto scrap pieces of Whisper White CS using Memento Tuxedo Black ink, colored them with Stampin' Blends and then fussy cut them.


For this first card I mounted the piece on a bottom mat (5-1/4" x 4") of Mossy Meadow CS that I embossed using the Country Floral Embossing folder.

This cup features the Daffodil Delight Blend and Mossy Meadow Stampin' Blend sets.  It was popped up using Dimensionals onto a Pearlized Doily that I glued to the card using Tombow Glue.

The sentiment is from the PP kit and was stamped with Mossy Meadow ink onto  Daffodil Delight CS and die cut using a die from the Petals & More Thinlits. It was popped up using Dimensionals.

The completed mat was mounted onto a White Card base.

For this second card I glued the diagonal cut alongside a diagonal cut of Fresh Fig CS that I embossed using the Country Floral Embossing folder onto one of the Vellum pieces that came in the kit and then onto a 5-1/2" x 4-1/4" piece of Old Olive CS.

The cup features the Smoky Slate and Rich Razzleberry Blend Sets and was popped up using Dimensionals onto a Pearlized Doily.

This sentiment is from the PP kit and was stamped with Fresh Fig ink onto a banner cut from Smoky Slate CS. It was popped up using Dimensionals.

The completed mat was mounted onto a White Card base.

For this third card I glued the diagonal cut onto a bottom mat of Pear Pizzazz CS.

The cup features the Rich Razzleberry and Granny Apple Green Blends and was mounted onto a square of Whisper White CS die cut using the Stitched Shape Framelits and then glued to a scallop square die cut of Rich Razzleberry CS using the Layering Square Framelits.  This piece was popped up using Dimensionals.

The sentiment is from the PP kit and was stamped with Rich Razzleberry ink onto Whisper White CS, die cut using a die from the Petals & More Thinlits Dies. It was popped up using Dimensionals.

The completed mat was mounted onto one of the Striped Card bases that came in the PP kit.


For the fourth card I used some Tear & Tape Adhesive strips to attach the diagonal cut alongside a diagonal cut of Fresh Fig CS that I embossed using the Country Floral Embossing folder.

I attached a piece of Lemon Lime Organza ribbon to the top and bottom of the piece.  And then attached them to a bottom mat of Lemon Lime CS.

The cup features the Smoky Slate and Rich Razzleerry blends and was popped up with Dimensionals onto a Pearlized Doily that was glued to a scalloped circle die cut using the Layering Circle Framelits.

The sentiment is from the PP kit and was stamped with Rich Razzleberry ink onto Lemon Lime CS, and die cut using a Petals & More Thinlits Die.  It was popped up using Dimensionals.

The completed mat was mounted onto a White Card Base.

At the end I attached a few Rhinestones to each of the cards.

Wednesday, March 27, 2019

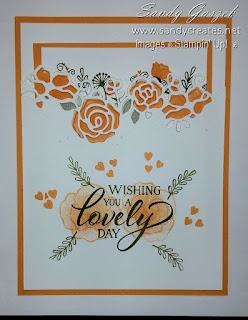
These three pocket cards feature the Forever Lovely stamp set and the coordinating Lovely Flower Edgelits dies from Stampin' Up!

Link to My Stampin' Up! Store


I began by stamping the insert for the cards.  This first one was stamped in Crushed Curry and Old Olive inks onto a piece of Whisper White CS 4-1/2" x 3-1/4" and mounted onto a piece of Crushed Curry CS 4-3/4' x 3-1/2".

The sentiment is from the Beautiful Bouquet Stamp Set and was stamped with Crushed Curry ink.


Then I created the pocket for the insert by die cutting a piece of Whisper White CS with the Edgelit die from the coordinating Lovely Flower dies.  I trimmed the piece of WW CS to 4" wide  x 4-1/4" tall (to the top of the die cut).

I stamped the sentiment from the Forever Lovely stamp set in Old Olive ink.  The stamped the 2 flowers from Forever Lovely in Crushed Curry ink (2nd generation stamping) across the sentiment as shown.  Then added the leaf sprigs and hearts in the same colors as shown using other dies from the set.

Lastly glued the card front onto a  5-1/4" x 4" Whisper White CS mat to form the pocket, mounted  it onto a 5-1/2" x 4-1/4" base using a thin line of Tombow glue on the sides and bottom edges .  Let it dry completely before inserting the other inside mat to complete the pocket card.


This version of the card was stamped using Highland Heather and Old Olive inks and Highland Heather CS.


And this version of the card was stamped using Peekaboo Peach and Mossy Meadow inks and Peekaboo Peach CS.


Monday, March 25, 2019

These two A2 size cards feature the Falling Flower stamp set from Stampin' Up!

For this first card I used a piece of Whisper White CS for the top mat and created a background using what I call a "texture stamp" -  this one is from the Beautiful Blizzard stamp set.

Then I stamped the  flowering branch from the Falling Flower stamp set in 2 places with Versamark ink, sprinkled it with Recollections Eggplant embossing powder and heat set it.  I cut a flower using one of the dies from the coordinating May Flower Framelits and embossed  it with the same Eggplant embossing powder.

The sentiment is from the Dandelion Wishes stamp set and was also heat embossed and then banner cut.

I assembled the card by adding 2 pieces of White Organza ribbon, gluing on the flower and then the sentiment banner.  Lastly I mounted the top mat onto a bottom mat of Night of Navy cardstock.  And the finished piece was mounted on a White card base.


This second card was stamped similarly but the flower piece was cut with one of the Layering Ovals framelits, then mounted on a mat of Wisteria Wonder CS cut with one of the Rectangular Stitched Rectangle, layered on a bottom mat of Night of Navy CS that was  embossed using the Tin Tile embossing folder.  The finished piece was mounted on a White card base.

The sentiment is from the Sheltering Tree stamp set and was stamped on a scrap of Whisper White CS using Wisteria Wonder ink.  It was cut with a banner die from the Bunch of Banners Framelits die set.


Link to My Stampin' Up! Store

Saturday, March 23, 2019

These A2 size cards feature the Forever Lovely Stamp Set from Stampin' Up!.

I used the 2-step flower and leaf stamps from the stamp set which are easily aligned with the Stamparatus. Place the flower stamp on a scrap piece of CS, set slightly down from the top center of the Stamparatus base. Hold the CS in place with one of the magnets provided.  Stamp the image on the scrap piece to make sure you have it positioned as desired.  Lift up the plate and leave the stamp in place. Leave the CS in the same spot, line up the leaf stamp on top of the stamped image, and pick the stamp up with the other plate. Test stamp the leaves.  Once you have the 2 stamps aligned properly you can proceed with the stamping.   It may be helpful to mark the corners on the Stamparatus grid paper so that as you rotate the CS it is re-positioned correctly.

On this first card I started by stamping the flower on the left end of the top mat of Whisper White CS with Wisteria Wonder Ink. And then switched to the other plate and stamped the leaves in Soft Sky Ink.  I rotated the piece 180 degrees in the Stamparatus and repeated the process on the other end.  Then rotated the piece and repeated the process on the top and bottom edges. I mounted the top piece onto a bottom mat of Soft Sky CS.  The sentiment from the Forever Lovely stamp set was stamped on a scrap piece of Soft Sky CS, was die cut using the large label die from the Stitched Label Framelits, popped up with Dimensionals and placed in the center of the top mat.  I finished off by adding a few Rhinestones.

This second card uses Flirty Flamingo and Pear Pizzazz CS and inks.


And this third card uses Lovely Lipstick and Lemon Lime CS and inks.


Link to My Stampin' Up! Store

Friday, March 22, 2019

Here are some cards I made in early February featuring the Meant to Be stamp set and coordinating Be Mine Stitched Framelits from Stampin' Up!.

I made this first card for my husband for Valentine's Day. The background DSP is from the All My Love series.  The heart dies and bottom layer were cut from Merry Merlot & Soft Seafoam cardstock.  The sentiment is from the Bloomin' Love stamp set using Merry Merlot ink.


This second Valentine Card uses the same All My Love DSP which was mounted on Lovely Lipstick cardstock.  The hearts were die cut from Lovely Lipstick and Soft Seafoam Cardstock.  The sentiment on this card is from the Meant to Be stamp set using LovelyLipstick ink.


I made this third card for my sister & brother in law for their wedding anniversary on Valentine's Day.  I used Pink Pirouette, Merry Merlot and Soft Seafoam for the hearts.  The top mat of Merry Merlot cardstock was embossed using the Lace Dynamic embossing folder.  The sentiment was stamped in Merry Merlot ink using a stamp from the Beautiful Bouquet stamp set.


These last 2 cards use the same color combinations.  One was embossed with the Lace Dynamic embossing folder and the other with the Tufted Dynamic embossing folder.

Link to My Stampin' Up! Store