Saturday, September 19, 2020

These cards feature the Peony Dies from Stampin' Up!.


I just love this layered Peony Die from Stampin' Up!.  I made the Peonies in several different colors and then picked Cardstock and/or  DSP to complement the paper and matching ink color.  This flower is made from four die cuts and then assembled.  After the individual pieces were die cut, I shaded each piece with a sponge dauber and matching ink around the outside edges.  You can see that I applied a wider strip of color to the bottom of each piece, and just a bit of color to the top edge. Then the pieces are assembled from smallest to largest, by inserting them inside the next larger piece. The pieces all align at the bottom edge which is easiest to see from the back of the flower.  I attached two glue dots to the bottom of the back of the piece to hold them in place. 

The bottom mat for this first card was cut from Pink Pirouette CS, the top mat was cut from a piece of Perennial Essence DSP.  The layered peony was cut from Whisper White CS and the edges shaded with Pink Pirouette Ink, it was popped up with Dimensionals.  The leaves were cut from Old Olive CS using dies from the featured set. The circular shape was cut from Blackberry Bliss CS using a die from the Painted Layers Dies. The flower center was also cut out of Blackberry Bliss CS. The sentiment is from the Floral Frames Stamp Set and was cut using one of the Layering Circle Dies, it was popped up with Dimensionals.  Lastly I added a few coordinating Enamel Shapes to the card.

The next cards are made similarly so I will only list the cardstock colors, DSP Sets, ink colors, and any other differences: 


Bottom Mat & Circular Shape:  Highland Heather
Top Mat:  Botanical Butterfly DSP
Peony:  Purple Posy CS, Purple Posy Ink
Leaves: Old Olive CS
Sentiment Piece:  Whisper White CS, Highland Heather Ink.


Bottom Mat & Circular Shape & Peony Center:  Blushing Bride CS
Top Mat:  Fresh Floral DSP
Peony:  Whisper White CS, Blushing Bride Ink
Leaves: Garden Green CS
Sentiment Piece:  Whisper White CS, Blushing Bride Ink, Stamp from Good Morning Magnolia Stamp Set.


Bottom Mat & Circular Shape & Peony Center: Pretty Peacock CS
Top Mat:  Perennial Essence DSP
Peony:  Whisper White CS, Pool Party Ink
Leaves:  Pool Party CS, Pool Party Ink
Sentiment Piece:  Whisper White CS, Pool Party Ink


Bottom Mat & Circular Shape:  Crushed Curry CS
Top Mat:  Country Lane DSP
Peony:  Daffodil Delight CS, Daffodil Delight Ink
Leaves:  Forever Flourishing Dies, Old Olive CS
Sentiment Piece, Whisper White CS, Crushed Curry Ink

Thursday, September 17, 2020

These cards feature the Prized Peony Stamp Set and coordinating Peony Dies from Stampin' Up!.


I just love this layered Peony Die from Stampin' Up!.  I made the Peonies in several different colors and then picked Cardstock and/or  DSP to complement the paper and matching ink color.  This flower is made from four die cuts and then assembled.  After the individual pieces were die cut, I shaded each piece with a sponge dauber and matching ink around the outside edges.  You can see that I applied a wider strip of color to the bottom of each piece, and just a bit of color to the top edge. Then the pieces are assembled from smallest to largest, by inserting them inside the next larger piece. The pieces all align at the bottom edge which is easiest to see from the back of the flower.  I attached two glue dots to the bottom of the back of the piece to hold them in place. 

The bottom mat for this first card was cut from Pool Party CS and then stamped with the middle size peony stamp using Pool Party Ink to create my own DSP.  I stamped the stemmed peony stamp in Memento Ink on a piece of Whisper White CS, colored the stem and leaves using the, and the bud was colored with the Rich Razzleberry Stampin' Blends. Then this piece was cut using one of the Stitched Nested Dies. The layered peony was cut from Rich Razzleberry CS, shaded with Rich Razzleberry Ink and popped up with Dimensionals (covering the flower of the stamped image).  The bow was made using Pool Party Shimmer Ribbon and attached with Glue Dots.  The sentiment is from the Beautiful Bouquet Stamp Set, was stamped on a scrap piece of Whisper White CS and cut out with one of the Stitched Label Dies. Lastly I added some Clear Epoxy Drops that I colored with the Rich Razzleberry Stampin' Blends. 

The bottom mat for this next card was cut from Petal Pink CS. I added a strip of gray Frosted Floral DSP to the left side and then cut a thin decorative strip of Gray Granite CS using a die from the featured set and glued it to the right edge of the DSP.  The Whisper White Mat on the top was cut using one of the Stitched So Sweetly Dies.  I sponged some Petal Pink Ink on the edges, added some Petal Pink Dots using a stamp from the Forever Ferns Stamp Set and popped this piece up with Dimensionals..  The layered peony was cut from Petal Pink CS, shaded with Petal Pink Ink and popped up with Dimensionals. The leaf pieces were cut from Old Olive and Pear Pizzazz CS, shaded with coordinating inks, and inserted under the peony using Tombow Glue.  The sentiment is from the Forever Ferns Stamp Set, was stamped on a scrap piece of Whisper White CS, and cut out using one of the Ornate Frames Dies.  Lastly I added some Petal Pink Pearls from my stash.


For this last card the bottom mat was cut from Pool Party CS, the top mat was cut from a piece of Frosted Floral DSP.  I added a strip of Pool Party CS across the center that I had cut using the Stitched Lace Die and trimmed to desired size. The layered peonies were cut from Pool Party CS, shaded with Pool Party Ink. The leaves were stamped using stamps from the featured set using Pool Party Ink on Pool Party CS and then cut using the coordinating dies from the featured set, they were glued to the base.  The bottom peony was popped up with Dimensionals.  The sentiment is from the Peaceful Moments Stamp Set and was stamped on a scrap piece of Whisper White CS using Pool Party Ink, and cut out using one of the Bunch of Banners Dies.  Lastly I added some Pearls from my stash. 


Here's One more Example in Tranquil Tide and Wisteria Wonder.

Wednesday, September 16, 2020

These cards feature the Prized Peony Stamp Set and coordinating Peony Dies from Stampin' Up!.


I just love this layered Peony Die from Stampin' Up!.  I made the Peonies in several different colors and then picked Cardstock and/or  DSP to complement the paper and matching ink color.  This flower is made from four die cuts and then assembled.  After the individual pieces were die cut, I shaded each piece with a sponge dauber and matching ink around the outside edges.  You can see that I applied a wider strip of color to the bottom of each piece, and just a bit of color to the top edge. Then the pieces are assembled from smallest to largest, by inserting them inside the next larger piece. The pieces all align at the bottom edge which is easiest to see from the back of the flower.  I attached two glue dots to the bottom of the back of each piece to hold them in place. 

The bottom mat for this card was cut from Melon Mambo CS, the next layered mat was cut from some Pop of Pink DSP I had in my stash. The top piece was cut from Whisper White CS using one of the Stitched Seasons Dies, it was popped up with Dimensionals. The stem is from the Timeless Tulips Stamp Set, the leaves are from the featured set, both were stamped with Wild Wasabi Ink.  The peony for this card  was cut from Melon Mambo CS, the edges were sponged with Melon Mambo Ink, and the assembled peony was popped up with Dimensionals. The ribbon was made with some Garden Green Stitched Satin Ribbon and attached with Glue Dots.  The sentiment is from the Beautiful Bouquet Stamp Set, was stamped on a scrap of Whisper White CS using Melon Mambo Ink, and cut out with one of the Stitched Label Dies.  Lastly I added some coordinating Enamel Shapes.


The bottom mat for this next card was cut from Soft Sea Foam CS, the next layered mat was cut from some Twinkle Twinkle DSP I had in my stash. The top piece was cut from Soft Sea Foam CS using the rectangle die from the Nature's Thoughts Die Set and popped up with Dimensionals..  I stamped the large stemmed peony from the featured set on a scrap piece of Whisper White CS using Memento Ink and cut it out with the coordinating die.  I cut off the large peony flower and colored the remaining stem and leaves using the Soft Sea Foam Stampin' Blends and the bud using the Magenta Madness Stampin' Blends. This piece was glued directly to the mat. The peony for this card was cut from Magenta Madness CS, the edges were sponged with Magenta Madness Ink, and the assembled peony was popped up with Dimensionals. I used the same sentiment as above but stamped it using Magenta Madness Ink and then lastly added some Enamel Dots.

Tuesday, September 15, 2020

These cards feature the Peony Dies from Stampin' Up!.


I just love this layered Peony Die from Stampin' Up!.  I made the Peonies in several different colors and then picked Cardstock and/or  DSP to complement the paper and matching ink color.  This flower is made from four die cuts and then assembled.  After the individual pieces were die cut, I shaded each piece with a sponge dauber and matching ink around the outside edges.  You can see that I applied a wider strip of color to the bottom of each piece, and just a bit of color to the top edge. Then the pieces are assembled from smallest to largest, by inserting them inside the next larger piece. The pieces all align at the bottom edge which is easiest to see from the back of the flower.  I attached two glue dots to the bottom of the back of the piece to hold them in place. 

For this first card the bottom mat was cut from Highland Heather CS, the top mat and the peony pieces were cut from Purple Posy CS and shaded with Purple Posy Ink.  I embossed the top mat using the Tufted Embossing Folder.  The "leaf stem" pieces were die cut from Highland Heather CS using one of the Forever Flourishing Dies.  The peony was popped up with Dimensionals.  Then I applied Tape Runner to the back of the leaf pieces and inserted them behind the peony.  The sentiment is from the Peaceful Moments Stamp Set and was stamped on a scrap piece of Whisper White CS using Highland Heather Ink, cut out with one of the Stitched Label Dies, and popped up with Dimensionals.  Lastly I added a few Clear Faceted Gems.


This next card was made similarly.  The bottom mat, peony and leaf pieces were cut from Rose Red CS and shaded with Rose Red Ink.  The top mat was cut from Pink Pirouette CS and then embossed using the Subtle Embossing Folder.  The sentiment is from the Peaceful Moments Stamp Set, was stamped on a scrap of Whisper White CS using Rose Red Ink, cut out using one of the Bunch of Banner Dies and then popped up with Dimensionals.  For this card I added some White Perfect Accent Dots.  

Friday, September 11, 2020

These cards feature the Painted Poppies Stamp Set from Stampin' Up!.


All of these cards were made using the Stamparatus and were all stamped using the Painted Poppies Stamp Set and the following set-up.  I carefully arranged the single poppy flower on the front side of one of the plates, the large single leaf on the other plate, the leaf stem on the reverse side of one of the plates, and the stemmed poppy on the reverse side of the second plate.  I also stamped and cut a mask of the single poppy flower from Post-It Tape.
It took several tries on scrap paper to get the pieces aligned properly.  Once it was all set I began each card by stamping the single poppy flower using Memento Tuxedo Black Ink, let if dry completely and then applied the mask.  The rest of the items were each stamped twice (I rotated the mat 180 degrees to stamp the opposite side) also using the Memento Ink.  Once everything was stamped and dried I removed the mask from the poppy flower and colored the flowers and leaves using Stampin' Blends.  
 
For this first card the bottom mat was cut out of Rich Razzleberry CS and then embossed using the Subtle Embossing Folder, the bottom layer of the center piece was cut from Whisper White CS, the frame edge piece was cut from Pear Pizzazz CS using the Rectangle Stitched Dies. The items were stamped in the same order as above using the Memento Ink.  The poppies and buds were colored with Rococo Rose Stampin' Blends, the leaves and stems with Old Olive Stampin' Blends. Then I stamped the center of the large poppy using the larger texture stamp from the featured set and the dots using one of the stamps from the Forever Ferns Stamp Set using Rich Razzleberry Ink. The sentiment is from the Label Me Bold Stamp Set and was stamped on a scrap piece of Whisper White CS, cut out with the Classic Label  Punch, trimmed to the desired length, and popped up with Dimensionals.  Lastly I added some coordinated Enamel Shapes.

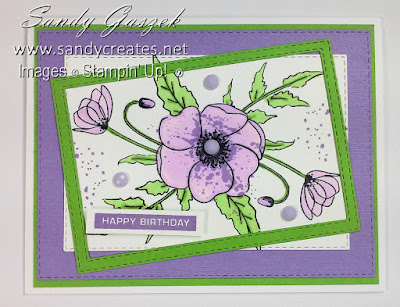
For this next card the bottom mat was cut from Granny Apple Green CS, the next mat from Highland Heather Card CS, then the next piece from Whisper White CS, and the frame piece from Granny Apple Green. The upper 3 pieces were cut using the Rectangle Stitched Dies. The Highland Heather piece was embossed using the Subtles Embossing Folder. The poppies and buds were colored with the Purple Posy Stampin' Blends, the leaves and stems with Granny Apple Green Stampin' Blends.  The center of the large flower and the dots were stamped with Highland Heather Ink. The sentiment was also stamped with Highland Heather Ink using one of the Label Me Bold Stamps, and cut out like the above card and popped up with Dimensionals.. Lastly I added some Purple Posy Faceted Dots. 

For this next card the bottom mat was cut from a piece of Peaceful Poppies DSP, the next mat from Whisper White CS, and the frame piece from Pool Party CS using the Rectangle Stitched Dies. The poppies and buds were colored with Pool Party Stampin' Blends, the leaves and stems were colored with the Shaded Spruce Stampin' Blends. The center of the flowers and the dots were stamped with Coastal Cabana Ink. The sentiments was stamped with Shaded Spruce Ink using one of the Label Me Bold Stamps, and cut out like the above cards, and popped up with Dimensionals.  Lastly I added some Shaded Spruce Rhinestones.


Thursday, September 10, 2020

These cards feature the Painted Poppies Stamp Set from Stampin' Up!.


These cards were made using the Stamparatus and were all stamped using the Painted Poppies Stamp Set and the following set-up.  I carefully arranged the single poppy flower on the front side of one of the plates, the large single leaf on the other plate, the leaf stem on the reverse side of one of the plates, and the stemmed poppy on the reverse side of the second plate.  I also stamped and cut a mask of the single poppy flower from Post-It Tape.
It took several tries on scrap paper to get the pieces aligned properly.  Once it was all set I began each card by stamping the single poppy flower using Memento Tuxedo Black Ink, let if dry completely and then applied the mask.  The rest of the items were each stamped twice (I rotated the mat 180 degrees to stamp the opposite side) also using the Memento Ink.  Once everything was stamped and dried I removed the mask from the poppy flower and colored the flowers and leaves using Stampin' Blends.  

The standard sized bottom mat for this first card was cut from Poppy Parade CS, the standard sized top mat was cut from Peaceful Poppies DSP.  The top stamped layer was cut from Whisper White CS. I stamped on an oversize piece of CS and then cut out the piece as desired for each card. For this first card I colored the poppies and buds using a combo of Poppy Parade and Real Red Stampin' Blends.  The leaves and stems were colored using a combo of Mossy Meadow and Granny Apple Green Stampin' Blends.  For the dots I used one of the dotted stamps from the Forever Ferns Stamp Set and Poppy Parade Ink.  I cut out the piece using the frame die from the Nature's Thoughts Die Set and attached it to the card using Dimensionals.  The sentiment is from the Timeless Tulips Stamp Set and was stamped on a scrap piece of Whisper White CS using Old Olive Ink, cut out with a die from the Merry Christmas Thinlets Set, and attached as shown with Tape Runner. I added a single Clear Epoxy Droplet colored with the Dark Poppy Parade Stampin' Blend to the center of the large poppy.

For this next card the bottom mat was cut from Flirty Flamingo CS, the top mat from Whisper White CS using the Rectangle Stitched Dies.  I applied an oval mask to the Whisper White piece and colored the center using Flirty Flamingo and Old Olive Inks using Blender Brushes.  I removed the mask and then stamped the flowers, leaves and stems using Memento Ink.  Next I cut a smaller oval shape from the center of the piece using the Layering Oval Framelit Dies. The sentiment is from the By the Bay Stamp Set and was stamped as shown using Old Olive Ink.  The rectangle piece was popped up with Dimensionals and then the oval shape was inserted and glued back into the center of the bottom piece.  I love this effect.  Lastly I added some coordinated Enamel Shapes.


The standard sized bottom mat for this first card was cut from Old Olive CS, the standard sized top mat was cut from Purple Posies DSP, embossed using the Tasteful Texture Embossing Folder and then the dots were stamped using Blackberry Bliss Ink.  The strip was cut from some Regals DSP and mounted on a slightly larger strip of Old Olive CS. These poppies were stamped on Whisper White CS with Purple Posy and Blackberry Bliss Inks.  The leaves were stamped with Old Olive Ink on Whisper White CS.  The sprigs were cut from Old Olive CS.     The sentiment is from the Timeless Tulips Stamp Set and was stamped on a scrap piece of Whisper White CS using Blackberry Bliss Ink, cut out with a die from the Merry Christmas Thinlets Set.  The sentiment and poppies were popped up with Dimensionals.   Lastly I added some Rhinestones as shown.  This card was inspired by one I saw on Pinterest made by Helen Chapman.

Wednesday, September 9, 2020

This card features the Painted Poppies Stamp Set from Stampin' Up!.


This is a very simple card to make and could be done in a variety of colors.  The bottom mat was cut from So Saffron CS, the middle mat from Seaside Spray CS, and the top mat from Whisper White CS, using the Rectangle Stitched  Dies.  I stamped the "arch" stamp from the Work of Art Stamp Set from top to bottom on the top mat using Pear Pizzazz Ink, Seaside Spray Ink, So Saffron Ink, and then Pear Pizzazz Ink again.  The poppies from the Painted Poppies Stamp Set were stamped with Memento Tuxedo Black Ink and then the centers with Pretty Peacock or Pear Pizzazz Inks.  The sentiment is from the Timeless Tulip Stamp Set, stamped on Whisper White CS and cut out with a die from the Merry Christmas Thinlits Die Set.  The top mat was attached to the middle mat at with Tape Runner and then popped up with Dimensionals.

Tuesday, September 8, 2020

These cards feature the Painted Poppies Stamp Set and the coordinating Painted Layers Dies from Stampin' Up!.


These cards all use the same basic layout and pieces, using the stamps from the Painted Poppies Stamp Set. The outline of the poppies were stamped on scrap pieces of Whisper White CS with Memento Tuxedo Black Ink. Then each piece was stamped with the somewhat solid poppy stamp, and then with one of the splotch stamps in the center (there are 2 different sizes).  The leaf outlines were stamped using various colors ink and then stamped with the "dotted" stamp from the Beauty Abounds Stamp Set.  The pieces were then cut out with the Painted Layers Dies.  The circle shape is also from the Painted Layers Dies.

These cards were inspired by one I saw on Pinterest by Julie Davison.

For this first card the bottom mat and the circle piece were cut from So Saffron CS, the top mat was cut from some Pear Pizzazz DSP, and the strip between was cut from a piece So Saffron DSP.  The outline poppies pieces were colored using the solid and center poppy stamps with So Saffron Ink.  The leaf outline and dots were both stamped using Pear Pizzazz Ink. The sentiment is from the Healing Hugs Stamp Set and was stamped with Memento Ink onto the circle shape.  The poppies were popped up with Dimensionals and some coordinating Glitter Enamel Shapes added to the centers.

For this next card the bottom mat was cut from a piece of Country Lane DSP, the top mat from a piece of Garden Lane DSP, and the strip between them from Pear Pizazz CS.  The poppies were colored using the solid and center poppy stamps with Blackberry Bliss Ink. The leaf outline was stamped using Mossy Meadow Ink and dots were stamped using Pear Pizzazz Ink. The circle piece was cut from Blackberry Bliss Ink.  The same sentiment was used as above, but for this card was stamped on a separate piece of Pear Pizzazz CS, using one of the Layering Circles Dies, and then popped up with Dimensionals.  I added some Clear Faceted Gems to the center of the poppies.

For this card the bottom mat and the circle shape were cut from Berry Burst CS, the top mat from some Mint Macaron DSP, the strip from some Berry Burst DSP. The poppies were colored with Berry Burst and Rich Razzleberry Inks. The leaf outline was stamped with Memento Ink and dotted with Mint Macaron Ink. The sentiment was stamped with Memento Ink. Some coordinating Glitter Enamel Shapes were added to the center of the poppies.


For this card the bottom mat was cut from some Calypso Coral DSP, the top mat from some Calypso Coral CS, the strip from some Calypso Coral DSP.  I added an additional mat that I cut from Whisper White CS under the top mat for some contrast between the layers. The circle was cut from Whisper White CS and the sentiment stamped with Calypso Coral Ink. I didn't use the solid poppy stamp this time, just the splotch center stamp and then some extra dotting using the Beauty Abounds Stamp. The leaf outline and dots were both stamped with Calypso Coral Ink.  Some Coordinating Enamel Dots were added to the center of the poppies. 

For this last card the bottom mat and circle piece were cut from Pool Party CS, the top mat from a piece of Parisian Blossoms DSP (matted on Whisper White CS) and the strip from some Pool Party DSP.  The poppy was stamped using the solid stamp with Pool Party Ink, the poppy center stamp using Bermuda Bay Ink.  The leaf outline was stamped with Bermuda Bay Ink, the dots with Pool Party Ink. The sentiment was stamped with Pool Party Ink. Faceted Gems were added to the poppy centers.

Saturday, September 5, 2020

 These cards feature the Painted Poppies Stamp Set from Stampin' Up!.


The bottom mat on this car was cut from Old Olive CS, the top mat was cut from Whisper White CS.  I stamped the stemmed poppy flowers from the Painted Poppies Stamp Set in Memento Tuxedo Black Ink, colored the flowers and bud with Poppy Parade Stampin' Blends, the stems and leaves with Old Olive Stampin' Blends, and then masked the flowers with pieces I stamped and cut out of Post-It Tape.  Next I sponged the card front using Blender Brushes. I used Balmy Blue Ink on the top portion of the card, Poppy Parade Ink on the middle portion, and Old Olive Ink on the bottom portion.  Then I used the same colors inks and "dotted" the card front using the two splotch stamps that came in the featured stamp set.  The butterfly is from the Beauty Abounds Stamp Set and was stamped with  the Memento Ink. The sentiment is from the Timeless Tulips Stamp Set and was stamped on a scrap piece of Whisper White CS using the Old Olive Ink. It was die cut using one of the Merry Christmas Thinlets Dies and popped up with Dimensionals. This card was inspired by one I saw on Pinterest by Karen Fuller.

The bottom mat for this next card was cut from Cajun Craze CS, the top mat was cut from Whisper White CS.  I stamped the stemmed poppy flower and the clustered poppy flowers using Memento Tuxedo Black Ink, colored the flowers as shown using the Dark Calypso Coral Stampin' Blend, the stem and leaf with the Dark Call Me Clover Stampin' Blend. Then I used my Blender Brushes to color the background using Blueberry Bushel Ink on the top section, Calypso Coral Ink on the center section, and Call Me Clover Ink on the bottom section. I spattered some ink across the card using my Aqua Painters to create the "drops".  The sentiment is from the Good Morning Magnolia Stamp Set and was stamped with Cajun Craze Ink.  The butterfly is from the Papillion Potpourri Stamp Set and was stamped on a scrap of Whisper White CS with Cajun Craze Ink, cut out the Bitty Butterfly Punch and glued to the card with Tombow Glue. This card was inspired by one I saw on Pinterest by Melissa Kerman.

Friday, September 4, 2020

These cards feature the Painted Poppies Stamp Set and the coordinating Painted Layer Dies from Stampin' Up!.


The bottom mat on this card was cut from Old Olive CS, the top "frame" mat was cut from Poppy Parade CS and the center was cut out using one of the Stitched So Sweetly Dies.  The mat in between is Whisper White CS and was stamped and colored and then inserted between the other 2 mats.  I cut some "poppy" masks from Post-It tape by stamping the Poppy stamps onto the  tape with Memento Tuxedo Black Ink and then fussy cutting them out.  Then as I stamped each poppy flower on the white mat with Memento Ink, I covered each poppy with a mask so than nothing would overlap.  Next I stamped the stems in Memento Ink. And then I stamped some "greenery" on the bottom using a stamp from the Home to Roost Stamp Set using Old Olive Ink. I colored the top and bottom part of the mat using Blender Brushes - Balmy Blue Ink on the top section and Old Olive Ink on the bottom section.  I "dotted" both sections using a stamp from the Forever Fern Stamp Set. I removed the mask from the poppies and colored them and the buds using the Poppy Parade Stampin' Blend Set, and then colored the stems and leaves using the Old Olive Stampin' Blend Set.  I colored some clear Epoxy Shapes using the Poppy Parade Blends and place them at the center of the three flowers. The sentiment is from the Peaceful Moments Stamp Set and was stamped using the Memento Ink. 


The next card was made similarly.  The card bottom mat was cut from Old Olive CS, the top mat was cut from Whisper White CS.  The poppies, stem and leaves, and the sentiment were all stamped with Memento Ink. The sentiment is from the Peaceful Moments Stamp Set.  The poppies were masked as above and then using Blender Brushes, I colored the bottom section using Old Olive Ink and above a bit of Marina Mist Ink.  I "dotted" the sections and stamped the "greenery" as above.   Then I removed the masks and colored the poppies and buds using the Daffodil Delight Stampin' Blend Set.  The leaves and stems using the Old Olive Blend Set.  I added some coordinating Enamel Shapes to the center of the Poppies.


The bottom mat on this card was cut from Rich Razzleberry CS, the top mat from Whisper White CS. This last card was stamped, masked and "dotted" similarly as above.  The poppies were colored with Rich Razzleberry Stampin' Blends, the leaves and stems with Granny Apple Green Stampin' Blends. I stamped an extra flower on a scrap of Whisper White CS, colored it with the same RR blends and die cut it with the coordinating die from the Painted Layers Die Set.  The circular shape is from the Swirly Scribbles Die Set and was cut from Granny Apple Green CS.  The leaves were also cut from Granny Apple Green CS using the Painted Layers Dies and then sponged around the edges with Granny Apple Green Ink for some contrast.  This poppy was popped up with Dimensionals. The sentiment is from the Peaceful Moments Stamp Set and was stamped with Rich Razzleberry Ink.  Coordinating Enamel Shapes were added to the center of the poppies and on the card front.

Wednesday, September 2, 2020

These cards feature the Lily Pad Dies and coordinating Lily Impressions Designer Series Paper from Stampin' Up!.


The bottom mat for this card was cut from Highland Heather CS.  The 2 mats in the center were cut from Grapefruit Grove CS and the Lily Impressions DSP.  The lily outline pieces were cut from Grapefruit Grove and Gorgeous Grape CS using one of the Lily Pad Dies.  Next I took the same die and traced the die on a piece of Clear Vellum, fussy cut it and layered the outline piece on top. I added two pieces of Gorgeous Grape Mini Striped Ribbon as shown. The sentiment is from the By the Bay Stamp Set, it was stamped on a scrap piece of Whisper White CS using Gorgeous Grape Ink and cut out using one of the Stitched So Sweetly Dies.  The sentiment was popped up with Dimensionals.


The bottom mat for this next card was cut from Lovely Lipstick CS, the top mat was cut from the Lily Impressions DSP.  The lily outline piece and the decorative strip were both cut from Lovely Lily CS using the Lily Pad Dies. The outline piece was layered onto a piece of Clear Vellum cut as detailed in the card above.