Friday, December 10, 2021

This is part 4 of a 4 part series of cards featuring the Friends are Like Seashells Bundle which includes the Friends Are Like Seashells Stamp Set and the Seaside Seashells Dies, and the coordinating Seashells 3D Embosssing Folder all from the May 2021-April 2022 Annual Catalog.

This card was CASED from one I saw on You Tube made by WOW NOLA Creations - if you haven't used Stampin' Blends with Rubbing Alcohol on Vellum you might want to watch this video and others before you proceed with this card.

You can click on the photo to get a closeup of the card below - it will show the details and colors much better.

-The bottom mat for this card was cut from Granny Apple Green CS.
-I colored some Pretty Peacock and Granny Apple Green Stampin' Blends " splotches" on a piece of Vellum and then used 90+%  Rubbing Alcohol to blend and spread the colors. 
-Next I carefully embossed the vellum using the Seashells Embossing Folder.
-To bring out the colors you add the Vellum piece to a piece of Whisper White CS.
-I wanted a bit more emphasis on the seashells so I stamped the various seashell and grasses stamps on the vellum over top of the embossing using Whisper White Ink.
-The sentiment is from the featured set and was stamped on a piece of Whisper White CS using Pretty Peacock Ink and cut out using the Stitched So Sweetly Dies.  I cut a piece of Granny Apple Green CS using one of the larger dies in the set and then popped up the first piece on the top.
-Lastly I added a few Opal Rounds that I colored with the Stampin' Blends listed above.

Saturday, December 4, 2021

This is part 3 of a 4 part series of cards featuring the Friends are Like Seashells Bundle which includes the Friends Are Like Seashells Stamp Set and the Seaside Seashells Dies, and the coordinating Seashells 3D Embosssing Folder all from the May 2021-April 2022 Annual Catalog.

These 3 cards were all made similarly using the featured set.  I did all my stamping using the Stamparatus, it took me quite a while to get the pieces lined up on the various clear plates but it was worth the time and gave me the ability to use all the same color on the seashells or a combination of one or more different colors.

You can click on the photo to get a closeup of the cards below - it will show the details and colors much better.

-The bottom mat for this first card was cut from Bermuda Bay CS.
-The top mat was cut from White CS and then I added some color with Blending Brushes and Pool Party, Balmy Blue, Soft Sea Foam, and Seaside Spray Inks.
-Then for the die cut -  you emboss your cardstock and then line up the large die from the featured Die Set and cut it out.
-I used blending brushes with Wisteria Wonder, Blushing Bride, So Saffron and Balmy Blue to color the shells, and then Pear Pizzazz and Soft Sea Foam to color the foliage.
--I added a few drops of Frosted White Ink onto a clear block and then used a Blending Brush to add some shine and a bit of sparkle to the entire die cut.
-The finished piece was popped up with Dimensionals.
-Lastly I added a few Opal Rounds.


-The bottom mat for this second card was cut from Soft Sea Foam CS and embossed with using the Painted Texture Embossing Folder that I lightly inked with some Seaside Spray Ink.
-For the die cut -  I used the Stamparatus (see above) to stamp the shells with Blushing Bride, Sahara Sand, Seaside Spray, and So Saffron Inks, than you emboss your cardstock and then line up the large die from the featured Die Set and cut it out.
-I used blending brushes with Soft Sea Foam Ink to color the foliage.
--I added a few drops of Champagne Mist Ink onto a clear block and then used a Blending Brush to add some shine and a bit of sparkle to the entire die cut.
-The finished piece was attached to the card base with Tape Runner.
-Lastly I added a few Blue Adhesive Backed Gems.


-The bottom mat for this last card was cut from Pool Party CS
-The top mat was cut from Sand & Sea DSP.
-For the die cut -  I used the Stamparatus (see above) to stamp the shells with Blushing Bride, Crumb Cake, Seaside Spray, and So Saffron Inks, than you emboss your cardstock and then line up the large die from the featured Die Set and cut it out.
-I used blending brushes and the inks above to add extra color to the seashells.
-I used blending brushes with Pool Party and Soft Sea Foam Ink to color the foliage.
-I added a few drops of Frosty White Ink onto a clear block and then used a Blending Brush to add some shine and a bit of sparkle to the entire die cut.
-The finished piece was popped up with Dimensionals.
-Lastly I added a few Opal Rounds.

Sunday, November 21, 2021

This is part 2 of a 4 part series of cards featuring the Friends are Like Seashells Bundle which includes the Friends Are Like Seashells Stamp Set and the Seaside Seashells Dies, and the coordinating Seashells 3D Embosssing Folder all from the May 2021-April 2022 Annual Catalog.

These 4 cards were all made similarly using the featured set.  I did all my stamping using the Stamparatus, it took me quite a while to get the pieces lined up on the various clear plates but it was worth the time and gave me the ability to use all the same color on the seashells or a combination of one or more different colors.

You can click on the photo to get a closeup of the cards below - it will show the details and colors much better.

-The bottom mat for this first card was cut from Blushing Bride CS.

-The top mat was cut from a piece of Tranquil Texture DSP.

-I stamped all the seashells using Blushing Bride Ink on Basic White CS, embossed the piece, and then die cut it.

-I added a few drops of Champage Mist ink onto a clear block and then used a Blending Brush to add some shine and a bit of sparkle to the die cut.

-I attached the finished piece to the top mat with Tape Runner and then added a few Genial Gems.


-The bottom mat for this next card was cut from Pear Pizzazz CS.

-The top mat was cut from a piece of Sand & Sea DSP.

-I stamped the seashells using Sahara Sand & Seaside Spray Inks on Basic White CS, embossed the piece, and then die cut it. I used a Blending Brush with Soft Foam Ink to color the foliage parts of the die cut.

-Then, as on the card above I added a few drops of Champage Mist ink onto a clear block and used a Blending Brush to add some shine and a bit of sparkle to the die cut.

-I attached the finished piece to the top mat with Tape Runner and then added a few Genial Gems.


-The bottom mat for this card was cut from Pear Pizzazz CS.

-The top mat was cut from a piece of See A Silhouette DSP.

-I stamped the seashells using Pear Pizzazz Ink on Basic White CS, embossed the piece, and then die cut it. I used a Blending Brush with Soft Foam Ink to add some extra color to the shells and then some Balmy Blue ink to color the foliage parts of the die cut.

-I finished the die like the one above but for this card I used Frost White Ink.

-I attached the finished piece to the top mat with Tape Runner and then added a few Opal Rounds that I colored with Stampin' Blends.


-The bottom mat for this last card was cut from Misty Moonlight CS.
-The top mat was cut from a piece of Sand & Sea DSP.

-I stamped the seashells using Soft Sea Foam and Seaside Spray Inks on Basic White CS, embossed the piece, and then die cut it. I used Blending Brushes with Soft Foam Ink and Seaside Spray Ink to add some extra color to the shells.

-I finished the die like the one above with Frost White Ink and then added a little Shimmer Spray.

-This time I popped up the finished piece with Dimensionals and then added a few Genial Gems.

-This card was inspired by a Video I watched by Frenchie Martin. 
-Oops I just noticed that I photoographed this card upside down.  Unfortunately I don't have the original to retake the picture.

Saturday, November 20, 2021

 This is part 1 of a 4 part series of cards featuring the Friends are Like Seashells Bundle which includes the Friends Are Like Seashells Stamp Set and the Seaside Seashells Dies, and the coordinating Seashells 3D Embossing Folder all from the May 2021-April 2022 Annual Catalog. 

These were 2 of the first cards I made with the featured items. I was just trying out the embossing folder and die to see how easy they were to line up, and it was actually quite easy.  You begin by embossing your cardstock and then line up the large die from the featured Die set and cut it out.

You can click on the photo to get a closeup of the cards below - it will show the details and colors much better.


-For the bottom mat on this first card, I cut a piece of Pretty Peacock CS  and then used a Blending Brush to add some splotches of Whisper White Ink, and used the dotted stamp from the featured set with Whisper White Ink to add some more color.

-Then I embossed and die cut the top piece as described above from another piece of Pretty Peacock CS,
once it was cut out I put a few drops of Frost White Ink on one of the clear blocks and used a Blending Brush to add color across the cut piece.  I loved this effect! 
 
-The finished piece was popped up with Dimensionals.

-Lastly I added several of the Elegant Facet Gems.


-The bottom mat on this second card was cut from Pool Party CS.

-The top mat was cut from a piece of Lily Impressions DSP.

-Then I embossed and die cut the top piece, as described above from a second piece of Pool Party CS. Once it was cut I finished it like the card above using Frost White Ink and then popped it up with Dimensionals.

-I finished it by adding several Elegant Facet Gems

Thursday, October 14, 2021

These cards feature the Hydrangea Haven Bundle which includes the Hydrangea Haven Stamp Set and Hydrangea Dies from the May 2021-April 2022 Annual Catalog.

-The bottom mat for this first card was cut from Elegant Eggplant CS.
-The top mat was cut from Hydrangea Hill DSP.
-Then I cut another piece of Elegant Eggplant CS that I embossed with the Tasteful Texture Embossing Folder and cut with one of the Stitched Rectangle Dies.
-I stamped the Flower/Stem Outline Stamp onto WhisperWhite CS using Mossy Meadow Ink - then used Old Olive Ink & the Leaf/Stem Fill on the stem.
-Using the flower die from the featured die set, I cut out a flower from the same Hydrangea Hill DSP that I used for the Top Mat.  I used Dimensionals to pop up up four additional tiny flowers that I cut with the tiny flower die from the set to add some dimension to the flower, and added some tiny pearls to the centers.
-The sentiment is from the Lovely You Stamp set and was stamped using Elegant Eggplant Ink, cut with the Stitched Label Dies, and popped up with Dimensionals
-Lastly I added some White Organza Sheer Ribbon and a bow, and a few larger pearls.

-The bottom mat for this next card was cut from Rococo Rose CS.
-The top mat was cut from a piece of Hydrangea Hill Mercury Glass Designer Acetate.
-The flower was stamped with Memento Ink.  The flower head was colored with Rococo Rose and Flirty Flamingo Stampin' Blends, the stem/leaf section was colored with Old Olive Stampin' Blends. The piece was popped up with Dimensionals.
-The sentiment is from the featured set and was stamped using Old Olive Ink.
-This bow was made from a piece of ribbon was leftover from an old Paper Pumpkin Set.
-Lastly I added several Rhinestones to the sentiment piece and the flower head.


-The bottom mat for this card was cut from Gorgeous Grape CS.
-The top mat was cut from a piece of the Hydrangea Hill DSP.
-The white piece was cut using one of the Ornate Layers Dies.  I added another piece cut from the Hydrangea Hill DSP to the center for better contrast.
-The flower with stem was stamped wtih Memento Ink and colored with the light Flirty Flamingo and both Highland Heather Stampin' Blends, then cut out and popped up with Dimensionals.
-I added a bow made with white Twine around the flower and hung the little tag cut from Purple Posy CS, stamped with a sentiment from the featured set using Gorgeous Grape Ink, and die cut with a die from the featured die set.


-The standard size bottom mat for this last card was cut from Seaside Spray CS and embossed with the Subtle Embossing Folder.
-The top mat was cut from Whisper White CS (4-3/4 x 3-1/2"). 
-I stamped the full hydrangea outline stamp on the card positioned as shown and then used Highland Heather and Old Olive inks with the "fill" stamps.
-I stamped some "dots" scattered around the mat using a stamps from Beautiful Blizzard Stamp Set
-I shaded the edges of the top mat using a Blending Brush and Misty Moonlight Ink.
-I decided to stamp the flower cluster outline stamp onto a scrap piece of Hydrangea Hill DSP, cut it out with the flower head die and then popped it up over the stamped image.  The I added some individual tiny flowers cut from Seaside Spray CS and Vellum to the top using the long die from the featured Die Set.  It's a quick way to cut 9 embossed flowers at once.
- The sentiment is from the featured set and was stamped with Misty Moonlight Ink,cut out with one of the Stitched Rectangle Dies and popped up with Dimensionals.
-I used a Mistly Moonlight Stampin' Blend to color some sheer Organza White ribbon for the bow.
-Lastly I added some of the Pastel Pearls.

Wednesday, October 6, 2021

 These cards feature the Hydrangea Haven Bundle which includes the Hydrangea Haven Stamp Set and Hydrangea Dies from the May 2021-April 2022 Annual Catalog.


These 4 cards were CASED from a video by Mary Anne Cowan that I saw on You Tube showing a quick and easy way to make 4 cards from one piece of Whisper White CS.


I used several different sentiments for these cards.  "You make me smile"  and "You are capable of Amazing Things" are both  from the featured set.  "Just Because" is from the Lovely You stamp Set.


I took a full sheet of CS and randomly stamped the full hydrangea outline stamp (with the stem), and the double leaf outline stamp across the CS using Basic Gray Ink.  Then I went back and stamped Gorgeous Grape Ink with the flower fill stamp to add color to the flower head, Old Olive Ink with the stem/leaf fill stamp to add color to the stem/leaf section of the full hydrangea stamp, and to the double leaf fill stamp for the leaf outline.


I also stamped "dots"in between the stamped items using a stamp from the Beautiful Blizzard Stamp Set and Highland Heather and Marina Mist Inks.

Be sure not to stamp to close together - leave a good amount of "white" space.

Next you cut the sheet down the middle in both directions and then trim each piece to your desired size for the top mat of the card - I tried my best to have a full hydrangea on each piece.


I used Blending Brushes to add shading on the white sections of the cards.  Misty Moonlight Ink for the top card.  And Old Olive, Misty Moonlight and Highland Heather Inks to this last card

I used Marina Mist, Gorgeous Grape, Mossy Meadow and Dapper Denim for the Bottom Mats.
I embossed the Gorgeous Grape and Marina Mist pieces using the Subtle Embossing Folder.

Lastly, I used a coordinating ribbon on each card and some type of gem or dot to finish the cards.

Thursday, September 30, 2021

Here are all of my cards made with the March 2021 Paper Pumpkin - Here's To You.  All were inspired by the kit or cards I saw on Pinterest.

These first 3 feature the cloud/lake/background scene:


These next 4 feature the mountain sunrise scene:


This next one uses the tree stamp and one of the tree cutouts to make a Christmas Card:


And this last one features the trees and flower stamps from the stamp set, and one of the stencils, that were included in the kit.


Saturday, September 25, 2021

 This is part 3 of a 4 part series featuring the Curvy Dies and Quite Curvy Stamp Set from the January-June 2021 Mini Catalog. They were part of the Quite Curvy Bundle. 

-The bottom mat was cut from Pretty Peacock CS.
-For the next mat I cut a piece of Mint Macaron DSP (any pattern could be used here).
-I cut one piece of White CS using the "Burst" Curvy Die, I stamped the sentiment from the featured set using Pretty Peacock ink and attached it at the top.
-The "leaf", "flower" and "bird" pieces were cut from White CS, and stamped using Memento Ink.  They were colored with Pretty Peacock, Mint Macaron and Mango Melody Stampin' Blends, and popped up with Dimensionals.
-Lastly I added a few Gold Sequins.


-For this next card I cut the bottom mat from Old Olive CS.
-For the next mat I cut a piece of Rich Razzleberry DSP (any pattern could be used here).
-I used the Dotted Curvy Die to cut 2 narrow  pieces from a piece of  White CS. 
 -I stamped the 2 leaf pieces and the 2 birds on White CS using Memento Ink.
-I colored the birds using Crumb Cake and Rococo Rose Stampin' Blends.
-The leaf pieces were colored with Rococo Rose, Old Olive, Rich Razzleberry, and Mossy Meadow  Stampin' blends.
-The sentiment is from the featured stamp set and was stmped on a scrap piece of White CS using Rich Razzleberry Ink, cut out with one of the Merry Christmas Dies and popped up with Dimensionals.
-Lastly I added a few Rich Razzleberry Pearls.

Friday, September 24, 2021

This is part 2 of a 4 part series featuring the Curvy Dies and Quite Curvy Stamp Set from the January-June 2021 Mini Catalog. They were part of the Quite Curvy Bundle. These 5 cards are a bit more complex than the ones I posted yesterday.  Each of these cards use 2 die cut pieces made with the Curvy Dies.  

-I used a Mint Macaron Card Base for this card.
-The bottom mat was cut from Pretty Peacock CS.
-The top mats (2 pieces) both cut from a single piece of Mint Macaron CS using the "Burst" Curvy Die.
I cut some off the top and bottom of the two pieces so I could insert a piece of Forever Greenery DSP in the center behind them. 
-The "leaf" pieces were cut from Pretty Peacock CS using one of the Forever Fern Dies.
-The 3 birds were stamped with Memento Ink on White CS. They were colored with Old Olive, Mint Macaron and Pretty Peacock Stampin' Blends, and popped up with Dimensionals.
-The sentiment is from the featured stamp set and was stamped with Pretty Peacock Ink.
-Lastly I added a few Gold Sequins.
-This card was CASED from one I saw on Pinterest by Lynda Emerson.

-The Bottom Mat on this card was cut from Pretty Peacock CS.
-The Top Mats (2 pieces) were both cut from a single piece of Lemon Lime Twist CS using the Dotted Curvy Die.
-Then I used the Leaf Pattern Die from the Curvy Dies to emboss and cut out leaves from the top piece. I also repeated the cut on a scrap piece of Pretty Peacock CS and inserted the individual Pretty Peacock leaves into the holes on the Lemon Lime Twist piece.  I used a small dab of Tombow Glue to hold them in place.
-I used the same DSP set for the center piece as above.
-These two birds were colored with the Pretty Peacock and Soft Sea Foam Stampin' Blends and then popped up.
-The sentiment is the same as on the card above.
-Lastly I added some coordinating Faceted Dots.

-For this third card the Bottom Mat was cut from White CS.
-The Top Mats (2 pieces) were both cut from a piece of Old Olive CS that I had embossed using the Tasteful Texture Embossing Folder. When you use the dotted die to cut both of the pieces they do not align the same as on the above two cards. Adjust the open space as desired.
-The sentiment is from the featured stamp set and was stamped with Mossy Meadow ink.
-The leaf branch pieces were cut from Mossy Meadow CS using a die from the featured bundle.
-The 3 birds were cut from Mango Melody CS, the leaf piece was cut from White CS, they were colored with Calypso Coral, Pumpkin Pie, and Old Olive Stampin' Blends and popped up with Dimensionals.
-Lastly I added a few Champagne Rhinestones.

-For this next card I used Pumpkin Pie and Mossy Meadow CS for the mats. I embossed the Pumpkin Pie CS using the Hammered Metal Embossing Folder.
-I used the Dotted Curvy dies for the cuts on the Pumpkin Pie Piece. And then I used the Leaf Pattern Die from the Curvy Dies to emboss and cut out leaves from the bottom piece, this time I just let the Mossy Meadow CS show thru the holes.
 -I used the same CS as on the card above to cut out the leaf piece, the leaf branches, and the birds as above, and the same Stampin' Blends to color them.
-Lastly I added some Gold Sequins as shown.
-I will add a sentiment at a later date.  I always like the flexibility of having a few cards without pre-stamped sentiments on them.

-For this last card I cut the bottom mat from Just Jade CS that I embossed using the Tasteful Texture Embossing Folder.
-The top mats were cut from a single sheet of Rich Razzleberry CS - using the Dotted Curvy Die for both pieces and attaching them to a piece of White CS - this time I left a bit more space between the two halves so I would have room for the Leaf cutout.
-The leaf cutout was colored with Just Jade, Rich Razzleberry, and Misty Moonlight Stampin' Blends.
-The birds were colored with Rich Razzleberry and Crumb Cake Stampin' Blends.
-The sentiment from the featured set was stamped with Versamark Ink.
-And lastly I added some Coastal Cabana Rhinestones.

Thursday, September 23, 2021

 This is part 1 of a 4 part series featuring the Curvy Dies and Quite Curvy Stamp Set from the January-June 2021 Mini Catalog. They were part of the Quite Curvy Bundle. These 7 cards are pretty basic, feature various DSP, and are quick and easy to make.  Don't feel you have to use the same patterned DSP - pick from something you have on hand and coordinate it with matching CS.


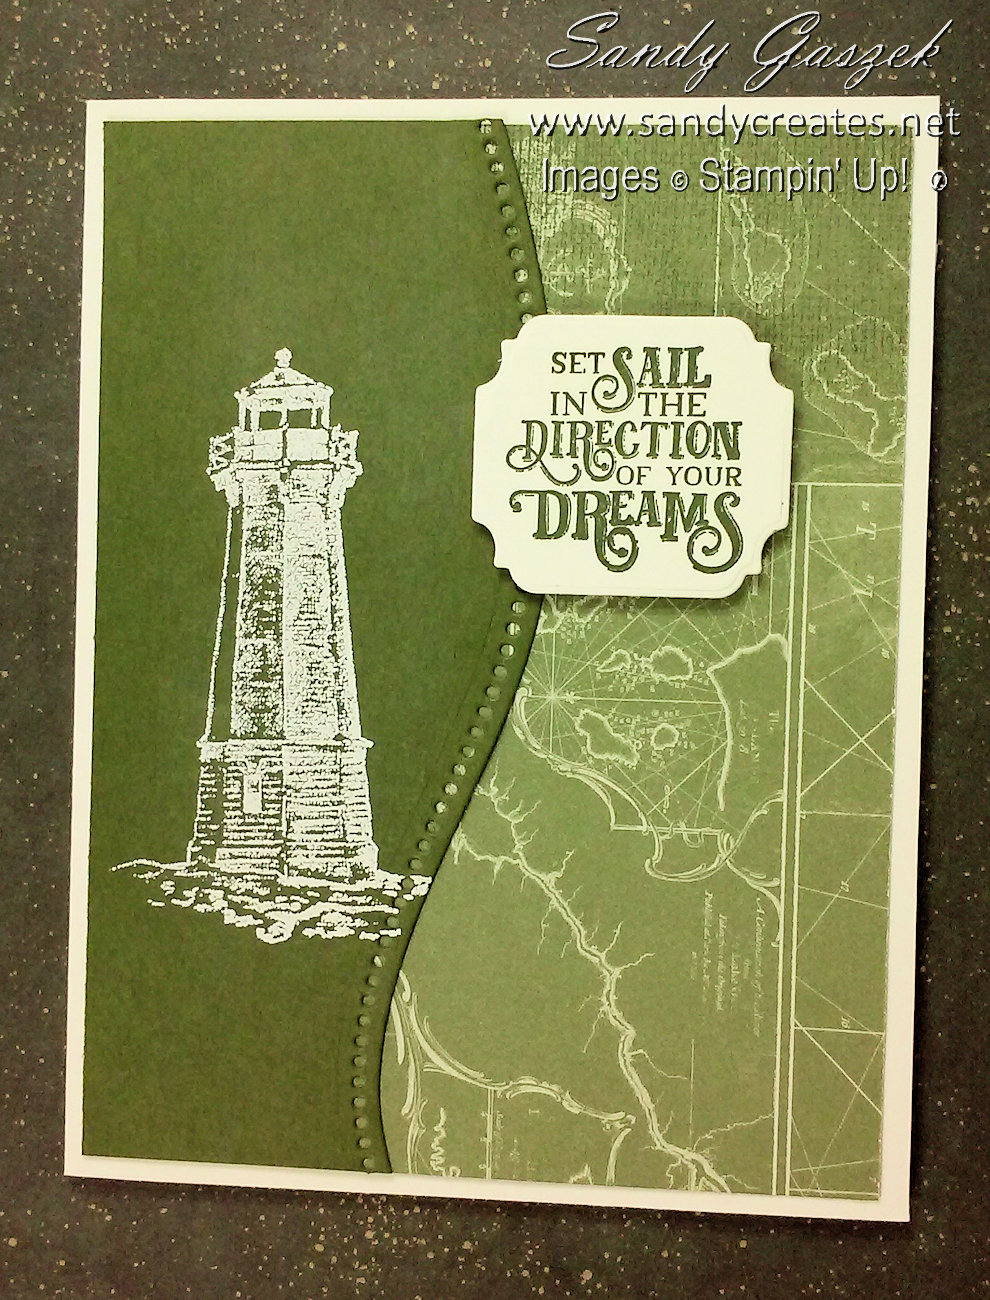
-The standard size bottom mat for this first card was cut from a piece of Come Sail Away DSP.
-I used the dotted Curvy Die to cut a piece from Mossy Meadow CS. These pieces can be cut to any width desired.
-The lighthouse and sentiment are from the Sailing Home Stamp Set.  
-I stamped the lighthouse image with Versamark Ink and heat embossed it with White Embossing Powder.
-The sentiment was stamped using Mossy Meadow Ink on Whisper White CS and cut out using one of the Ornate Frames Dies. It was popped up with dimensionals.


-The bottom mat was cut from Night of Navy CS.
-The top mat was cut from Misty Moonlight CS.
-I cut a 1-1/4" strip of Misty Moonlight DSP (you can use the pattern of your choice). And attached it to the Misty Moonlight Mat (about 3/4" from the bottom) with Tape Runner.
-I used the dotted Curvy Die to cut a coordinating piece of DSP from the Dandy Garden DSP
pack.  I attached it as shown with Tape Runner.
-The dragonfly was cut with the Dragonfly Punch from a piece of the Dandy Garden DSP and colored with Wink of Stella. It was popped up with Dimensionals.
-The sentiment is from the featured Quite Curvy Stamp Set and was stamped on a scrap piece of Whisper White CS using Misty Moonlight Ink, and popped up with Dimensionals as shown.  (I love this sentiment.)
Lastly I added 3 of the Iridescent Pearls.
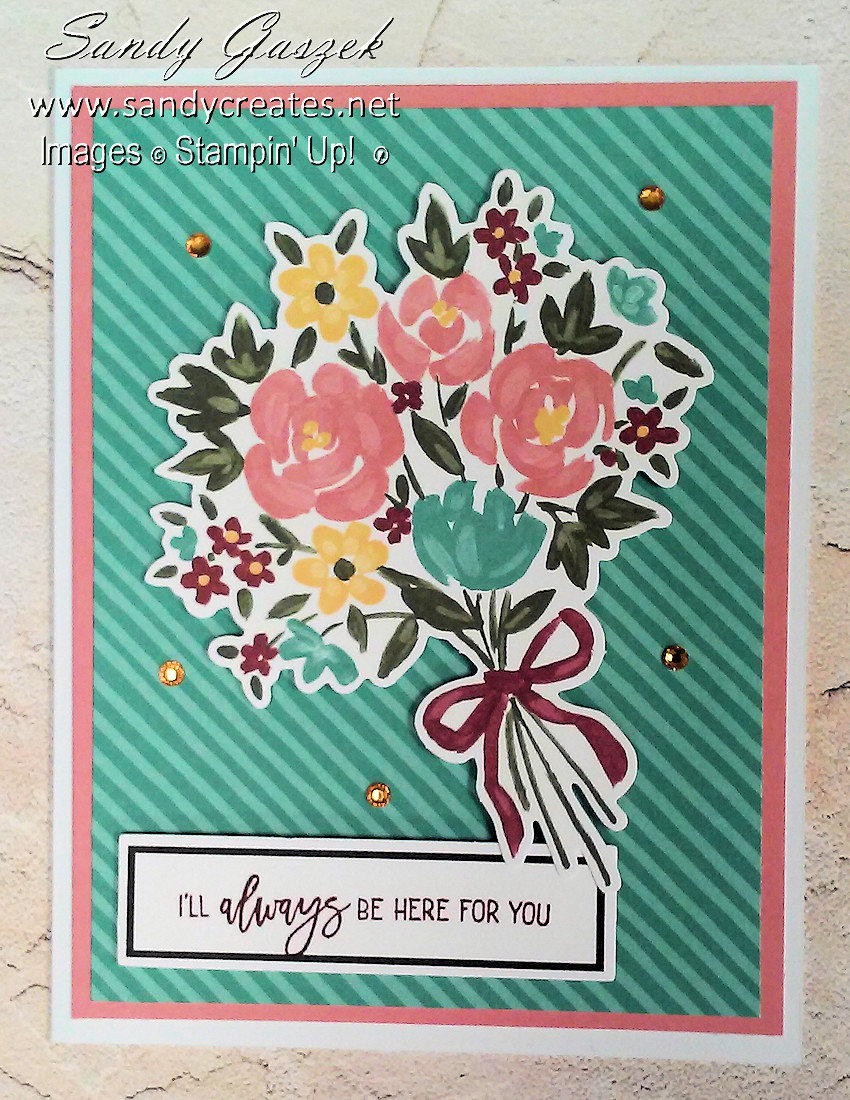
-This card was CASED from one I saw on Pinterest by Kim Arlene.


-The bottom mat was cut from Garden Green CS.
-The top mat was cut from Garden Lane DSP.
-I used the dotted Curvy Die to cut a piece from Whisper White CS.  I attached a thin strip of Garden Green under the left edge to add a little contrast between the top mat and the Curvy Piece..
-The flower was stamped in Garden Green Ink and is from the Dragonfly Garden Stamp Set.
-The sentiment is from the featured set and embossed with White Embossing powder. It was attached with Tape Runner.
-Lastly I added a few coordinating Enamel Shapes and a White Twine Bow.
-This card was inspired by one I saw on Pinterest by Ann Alexander.


-The bottom mat was cut from Rich Razzleberry CS.
-The standard size top mat was cut from Always Artichole CS and attached to the bottom mat with Tape Runner.
-Next a cut 3rd mat from a Piece of Dandy Garden DSP (1/4") smaller at 4-3/4x3-1/2" and attached with Tape Runner.
-I again used the Dotted Curvy Die to cut a piece from Blackberry Bliss CS and attached it as shown with Tape Runner.
-The Dragonfly was cut from a piece of Dany Garden DSP as in the second card above, I applied Wink of Stella and popped it up with Dimensionals.
- I used the same sentiment as on the above two cards - it was embossed with White Embossing powder onto the Blackberry Bliss Piece.
-Lastly I added 2 coordinating Enamel Hearts, as shown.
-This was inspired by a card I saw on Pinterest by Rene Purvine.


-
Bottom Mat cut from Mossy Meadow.
-Top Mat cut from Dandy Garden DSP.
-2 crisscrossed pieces cut from Bumblebee CS using Dotted Curvy Die.
-Dragonfly from Dandy Garden DSP, as in previous posts.
-Same sentiment as above stamped on Whisper White CS using Misty Moonlight Ink, cut our with one of the Merry Christmas Dies, and popped up.
-Lastly added some enamel shapes.


-Bottom Mat cut from Bumble Bee CS.
-Top Mat cut from Flowers For Every Season DSP.
-I used 2 pieces cut using the Dotted Curvy Die - one from So Saffron CS, the other from Whisper White CS.
-This "curvy" sentiment is also from the Quite Curvy Stamp Set and was stamped with Bumblebee Ink.
-The butterfly was cut from Bumblebee CS using oone of the Brilliant Wings Dies.
-Lastly I added some coordinating Resin Dots.


-Bottom Mat cut from Pear Pizza CS.
-Standard Top Mat cut from Country Lane DSP.
- Feature mat cut from Blackberry Bliss CS using the Dotted Curvy Die.
-On this card I wrapped the 3 pieces of CS with Twine and added a Twine bow.
-Then I stamped, cut out, and colored 2 of the Birds from the featured stamp set - on Bumblebee CS, with Memento Ink, and So Saffron & Crumb Cake Stampin' Blends, then popped them up with Dimensionals.
-This sentiment is from the To A Wild Rose Stamp Set and was stamped with Blackberry Bliss Ink on Whisper White CS, cut out with one of the Stitched Labels Dies, mounted on a scrap piece of Always Artichoke CS, cut with the Postage Punch and popped up.
-Lastly I added a few Champagne Rhinestones.

Saturday, September 18, 2021

Here are all of my cards made with the February 2021 Paper Pumpkin Kit - Bouquet of Hope.  All were inspired by the kit or cards I saw on Pinterest.

These first 3 cards feature the large die cut bouquet:


These next 3 cards feature the smaller flower cutouts:


 These next 5 cards feature the flower bouquet stamp from the kit colored with Stampin' Blends:


These last 3 cards feature the same stamp but this time heat embossed using Versamark and White Embossing Powder: