Monday, December 24, 2018

As Christmas is fast approaching, I have spent the last few days putting finishing touches on several Holiday Cards that were started, but not quite complete.


This first one uses the large "Blizzard" stamp from the Beautiful Blizzard stamp set from Stampin' Up!, which was stamped as a background for the sentiment stamp from Merry Christmas to All set, and the trees from Lovely as a Tree,  I used Pool Party and Tranquil Tide inks.   This is an A2 size card.

Merry Christmas to all my Blogger Friends!


These first 2 cards feature the die from the Beautiful Blizzard Bundle in Stampin' Up!'s 2018 Holiday Catalog.   The Blizzard Thinlits Die is a single die that cuts out lots of snowflakes all at once.   The pieces at the top of these 2 cards are from the cardstock left behind after the snowflakes are all removed.   I trimmed the pieces to size to fit my card and also added a few of the snowflakes and the sentiment to the bottom of the card.  
This last card features the large snowflake from Snowfall Thinlets.  I mounted it on a piece of Christmas DSP and a Cherry Cobbler cardstock.  These three are all A2 size cards.


These 2 cards feature the tree stamps from the Winter Woods Bundle from Stampin' Up!.  One stamped and mounted in Shaded Spruce, and the other using Tranquil Tide.  These are both A7 size cards.


Thursday, December 13, 2018

This holiday card features the Winter Woods stamp set from Stampin' Up!.  I began by sponging some Bermuda Bay and Coastal Cabana ink on the top mat of Whisper White CS. Then I stamped the trees with Versamark ink using clear embossing powder. To darken the background I sponged some Island Indigo ink onto the mat and then wiped off the embossed area revealing the lighter colored trees. I finished the card front by heat embossing some "snow" across the mat using white embossing powder. The Sentiment is from the November 2018 Paper Pumpkin kit. This card was inspired by a video done by Linda Bedinger.


Here's another card using a the same process, with different inks and a different layout.

These are both A2 size cards.


Wednesday, December 12, 2018

This card features the Signs of Santa Bundle from Stampin' Up!.  I think this is definitely the "cutest" set in this years 2018 Holiday Catalog.  Mr. & Mrs. Santa Claus and the sign post were stamped with Memento Tuxedo Black ink, colored with Stampin' Blends and die cut with the coordinating Framelits dies.  They were layered onto a piece of Whisper White CS that was embossed using their Softly Falling embossing folder.  The sentiment from Timeless Tidings was stamped in Real Red ink.  This is an A2 size card.

Material List:
Stamp Set: Signs of Santa  
Sentiment Stamp Set:  Timeless Tidings 
Dies:   Santa's Signpost Framelits
Inks:  Real Red, Memento Tuxedo Black 
Cardstock:   
--Card Base:  Whisper White A2 Card (Folded Size 5-1/2" x 4-1/4")
--Real Red Bottom Base Mat:  5-1/4" x 4")
--Whisper White Top Mat:  (5" x 3-3/4")
--Scraps of Whisper White to stamp Mr. & Mrs. Santa & Pole
--Scraps of Whisper White & Real Red for Sentiment
Stampin' Blends:  Real Red, Call Me Clover, Daffodil Delight, Smoky Slate, Cherry Cobbler, Flirty Flamingo  
Embellishments:  Wink of Stella for snow & hat & beard 
Other:  Softly Falling Embossing Folder
Basics:  Paper Trimmer, Adhesive Tape Runner, Tombow Glue,   Dimensionals, Mini Glue Dots, Scissors, Big Shot, Stamparatus

Directions:
-Cut all Cardstock Mats & Pieces per list.
--Stamp the Santas and Pole on Whisper White scraps with Memento ink.
--Color the 3 pieces as shown using Stampin' Blends.
--Optional - apply Wink of Stella to beard, hat & snow on Santa and Pole.
--Die Cut the 3 pieces using Santa's Signpost Framelits.
--Stamp the sentiment onto a scrap piece of WW CS and cut to size as desired.
--Cut a piece of Real Red to mat the sentiment.
--Run the Top WW Mat thru the Big Shot using the Softly Falling Embossing Folder.
--Pop-up the 3 pieces & sentiment as shown using dimensionals.
--Attach White Mat to Real Red Bottom Mat & then both to the Card Base using tape runner.

Monday, December 10, 2018

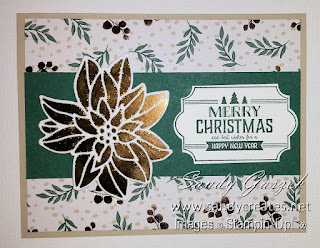
This Merry Christmas card features a die from the Detailed Poinsettia Thinlits from Stampin' Up! with a sentiment from their Labels to Love stamp set that was punched with the coordinating Everyday Labels punch.  I have used gold foil paper, Tranquil Die cardstock & a strip of Joyous Noel DSP.  This is an A2 size card.

Sunday, December 9, 2018

This Seasonal card features the Woodlands Texture Embossing Folder and Lovely as a Tree stamp set from Stampin' Up!.  I began by opening the embossing folder and sponging Island Indigo & Soft Sky ink on the inside of the embossing folder on the spaces in between the trees.  Then I stamped the trees in Tranquil Tide ink, inserted my Whisper White CS, closed the embossing folder & ran the it through the Big Shot. I mounted the finished piece on a Island Indigo CS.  The sentiment is from Merry Christmas to All stamp set. I CASE'd this process from a video I saw by Carolyn Serviss.  This is 6-1/2" x 4-1/2" card.

Saturday, December 8, 2018

This card features the Winter Woods Bundle from Stampin' Up!.  This is one of my two favorites bundles from the 2018 Holiday Catalog.  The dies were cut from Tranquil Tide and Mint Macaron and I used Tranquil Textures DSP for the background pieces behind the dies.  The sentiment is from the same bundle.  This is an A2 Size card.