Friday, February 14, 2020

This A2 Size card features the Bloomin' Heart Thinlits Dies from Stampin' Up! and is for my husband.

Link to My Stampin' Up! Store


The top mat was cut from So Saffron CS.

The bottom mat was cut from Fresh Fig CS.

The large heart was cut using a die from the Bloomin' Hearts Thinlits Dies from Fresh Fig CS and attached with Tape Runner.

The smaller flowers on the heart were cut using another die from the Bloomin' Heart Thinlits Dies using So Saffron CS and attached with Tombow Glue

The center heart shape was from the January 2019 PP Kit - "I'll Bee Yours" and stamped using So Saffron and Fresh Fig Inks and then cut out with one of the Heart Punches (come in a set of 2 from Stampin' Up!).   The bees were die cuts provided in the same Paper Pumpkin kit.  The center heart and the bees were popped up with Dimensionals.

I finished it off by adding 2 coordinating Enamel Heart Shapes.

The top mat was attached to the bottom mat and then to a White Card Base using Tape Runner.
These Valentine cards feature the Heartfelt Stamp Set, the coordinating Heart Punch Set, and various other products from Stampin' Up!

Link to My Stampin' Up! Store

This first one is for a good friend.  The top mat was cut from Whisper White CS and embossed using the Quilt Top Embossing Folder.

The bottom mat was cut from Blueberry Bushel CS.

The sentiment and the dotted heart on this card are both from the Heartfelt Stamp Set, they were both stamped with Blueberry Bushel Ink on Balmy Blue CS.  The bottom scalloped heart was punched from Blueberry Bushel CS.  I added a small Rhinestone for a little "Bling".

The other two hearts were stamped using the pattern stamp from the January PP "I'll Bee Mine" Stamp Set  with Whisper White Ink on Blueberry Bushel CS. The bottom layer scalloped hearts were punched from Balmy Blue CS.

The hearts were all punched using the coordinating Set of 2 Heart Punches.

I wrapped 2 pieces of  Stampin' Up! Blueberry Bushel Grosgrain Ribbon around the top mat. Then glued the top and bottom heart to the mat, and popped up the middle heart using Dimensionals.

The top mat was attached to the bottom mat and then the finished piece to the White Card Base using Tape Runner. 

This second card is for another good friend.  The top mat was cut from one of the packs of 6x6 Subtle DSP from Stampin' Up.

The bottom mat is cut from Gorgeous Grape CS.

The strips on the top mat are 1'3/4' by 3-3/4" and were cut from Highland Heather CS and stamped using a heart from the Heartfelt Stamp Set using Gorgeous Grape Ink.

The middle heart was stamped as on the card above using Whisper White Ink in Gorgeous Grape CS, cut with the scalloped Heart Punch.  It was popped up with Dimensionals.

The 2 tiny hearts were cut using a punch I have had forever - from Gorgeous Grape CS.

I added a few Rhinestones.

This third card is for my sister.  The standard size top mat was cut from Berry Burst CS and embossed using the Quilt Top Embossing folder.

The bottom mat was cut from Coastal Cabana CS.

The 2-3/4"  square in the middle of the card front was cut from Bermuda Bay CS  and stamped using the pattern stamp from the January 2020 PP Kit mentioned above.

The dotted heart and sentiment are from the Heartfelt Stamp Set were stamped in Bermuda Bay ink on Coastal Cabana CS and then punched out.  It was popped up onto the square using Dimensionals.

To finish off the card I attached two pieces of Bermuda Bay Mini Striped Ribbon and a few rhinestones.


This last card is for my sister-in-law and is made similar to the cards above.   The top mat was cut from the All My Love DSP set.

The bottom mat was cut from Real Red CS.

The hearts were cut from Real Red and Basic Black CS, stamped with Memento Black and Whisper White inks.

I found red ribbon in my stash that coordinated well with the real red and again added a couple of Rhinestones.

Thursday, February 13, 2020

This A2 size card features the Floral Essence Stamp Set and the coordinating Perennial Flower Punch from Stampin' Up!.  It was CASEd from one I saw on Pinterest made by Bonnie O'Neill.

Link to My Stampin' Up! Store

The bottom mat was cut from Berry Burst CS.

For the top mat a cut a piece of Whisper White CS at 4-3/4" x 3-1/2" (slightly smaller than usual).

I cut 4 strips 1-1/4" x 3-3/4" from the following colors of cardstock: Elegant Eggplant, Shaded Spruce, Rich Razzleberry and Sweet Sugarplum, glued them to the white piece, and then embossed the piece using the Hammered Metal Embossing Folder.

I stamped 2 each of the flower from the Floral Essence Stamp Set in Shaded Spruce, Rich Razzleberry & Elegant Eggplant Inks. I colored them using the Shaded Spruce, Rich Razzleberry, and Purple Posy Stampin' Blend Sets, and then used Tombow Glue to attach the 2 pieces together in the center.

The leaf clusters were stamped in Emerald Envy ink on Emerald Envy CS and then punched out using the Detailed Sprig Punch, and attached as shown using Tape Runner where necessary.

I glued a piece of Berry Burst Metallic Edge Ribbon toward the bottom of the top piece.

The sentiment is from the Home To Roost Stamp Set and was stamped in Elegant Eggplant Ink, cut out with a frame die from the Lily Framelits Set, and pooped up with Dimensionals.

Lastly I used the same color Stampin' Blend Sets to color some Clear Faceted Gems and attached them as shown.

The completed top mat was attached to the bottom mat, and then the piece was attached to a White Card Base with Tape Runner.

Tuesday, February 11, 2020

These four A2 size Wedding Cards feature a sentiments from the Beautiful Bouquet Stamp Set and the Elegant Butterfly Punch from Stampin' Up!,  combined with a Darice Embossing Folder.  They are really easy to make.

Link to My Stampin' Up! Store

For this first card the top mat was cut from Whisper White CS.
The bottom mat was cut from Coastal Cabana CS.

I used the Darice embossing folder to emboss the top mat.  Then I punched 2 butterflies from Silver Glimmer Paper and attached them to the card front as shown with Tombow Glue.

Then I applied Clear Wink of Stella to the 2 embossed butterflies still showing on the card front.

The wedding sentiment is from the Beautiful Bouquet Stamp Set and was stamped with Coastal Cabana Ink.

I finished off the card front with some coordinating Enamel Shapes.


The rest of the cards were made similarly.


For this 2nd card the bottom mat is cut from Soft Sea Foam CS, the sentiment was stamped with the coordinating ink, and the butterflies were punched from Sparkle Glimmer Paper. 


For this 3rd card the bottom mat is cut from Highland Heather CS, the sentiment was stamped with the coordinating ink, and the butterflies were punched from Silver Glimmer Paper.


And for this last card the bottom mat was cut from Petal Pink CS, the sentiment was stamped with the coordinating ink, and the butterflies were punched from Sparkle Glimmer Paper.

Monday, February 10, 2020

This A2 size card features the Dandelion Wishes Stamp Set and the Star of Light Stamp Set from Stampin' Up!.

Link to My Stampin' Up! Store

The top mat on this card was cut from Whisper White CS.

The bottom mat was cut from Mossy Meadow CS.

I began by stamping the trail of stars from the Star of Light Stamp Set toward the top with Crushed Curry Ink.

Next I stamped the dandelions from the Dandelion Wishes Stamp Set in Memento Tuxedo Black Ink as shown.

I used Sponge Daubers to apply Old Olive and Mossy Meadow inks toward the bottom and the edges of the top mat.  And then to apply So Saffron ink around the upper stamped dandelions and in the center of them as well, leaving a white area uninked.

I used a Stampin' Up Chalk Marker to dot the center of each dandelion.

The top mat was attached to the bottom mat and then to a White Card Base using Tape Runner.

The bow was made from Daffodil Delight Organza Ribbon from Stampin' Up!

This card was CASEd from one I saw on Pinterest by Michelle Zindorf.

Sunday, February 9, 2020

This A2 size cards features the Dandelion Wishes Stamp Set from Stampin' Up!  I have made lots of cards with this stamp set as it's one of my favorites.  This card was CASEd from one I saw on Pinterest

Link to My Stampin' Up! Store

The top mat on this card and the sentiment circle were cut from Basic Gray CS.

The bottom mat and the scalloped circle were cut from Coastal Cabana CS.

The dandelions were stamped with Versamark Ink, sprinkled with White Embossing Powder, heat set, and then colored using the Bermuda Bay Stampin' Blend Set.

The sentiment is also from the Dandelion Wishes Stamp Set and embossed with White Embossing Powder.

The circles were cut using the Layering Circle Framelits and the complete sentiment piece was popped up with Dimensionals.

The bow was made using Stampin' Up!'s Whisper White Polka Dot Tulle Ribbon and attached with Glue Dots.

This card was CASEd from a card made by Meg Holland.

Wednesday, January 22, 2020

This card features the Mountain Air Stamp Set and coordinating Majestic Mountain Dies from Stampin' Up!

I have posted 3 other cards using this set this week. This is definitely one of my favorites and easy to put together with well defined layers.

Link to My Stampin' Up! Store

The bottom mat was cut from Rich Razzleberry CS.

The top mat was cut from Seaside Spray CS.

I began by stamping the mountains (2 times) on the top mat using Blackberry Bliss Ink.  I used the top mountain mask (see my previous post) to cover the sky section and then used a Blender Brush and Rich Razzleberry and Blackberry Bliss Inks to color the mountains. I finished them by re-stamping the mountain outlines with Whisper White Ink so they were more defined.

Next I stamped the tree sections on 2 scraps of Tranquil Tide CS using Tranquil Tide Ink and cut them both out with the tree die from the Majestic Mountain Dies.  These were both layered onto the mountains that were stamped on the top mat using Tape Runner.

I applied Whisper White Ink using a cloud stencil I cut with the cloud die to the sky area.  Then stamped the birds using Memento Tuxedo Black Ink.

The deer were from the the Dashing Deer Stamp Set and were stamped on scraps of Whisper White CS with Early Espresso Ink, cut with the coordinating Detailed Deer Thinlits, and popped up with Dimensionals.

The finished top mat was attached to the bottom mat and then to a White Card Base using Tape Runner.

Monday, January 20, 2020

This card features the Mountain Air Stamp Set and coordinating Majestic Mountain Dies from Stampin' Up!

I have posted 2 other cards this week that I created using this bundle from Stampin' Up!  Each time I have tried to improve upon the previous version and methods. This is one of my two favorites, its a bit more complicated but I would likely use this same process for additional cards.

Link to My Stampin' Up! Store

The top mat for this card was cut from Whisper White CS.

The bottom mat was cut from Blueberry Bushel CS.

So what I did differently this time, was I created two masks using the Majestic Mountain Dies, cut from Post-It Tape.  I used the mountain scene die and the row of trees scene die.  In each case when I cut out the masks I saved the upper and lower pieces of the tape, this is especially helpful to make the trees more distinctive.

So before I began stamping, I applied the top piece cut using the tree die.  I taped it about in the center of the top mat, and then used a Blender Brush with Tranquil Tide Ink to color the lower half of the top mat. Once I was satisfied with the color, I removed the top piece of the tree mask and stamped two rows of trees in Tranquil Tide Ink once just below where I had applied the ink, and then further down the front of the mat, re-inking and then stamping to one side or the other so the trees were not aligned the same as the first row.  Notice how the ink on the stamped image is darker than the ink that was applied with the blender brush. After letting the ink dry for a bit, I applied the bottom half of the tree mask at the very top of the tree section so that when I stamped the mountains the color would not cover the ink I had applied.

Next I applied Seaside Spray Ink with a Blender Brush to the top half of the card.  And then stamped the three rows of mountains from the Mountain Air Stamp Set with Blueberry Bushel Ink.  Again I repeated the process of re-inking and then moving the placement of the stamp to the side and further down the page, and repeated this step again.

I applied some lines and dots of white ink with a Chalk Marker.

I left the tree mask on and applied the top mountain mask to cover the sky - this left only the mountain area open.  I used a Blender Brush wih Blueberry Bushel Ink to color in the mountain area.

I removed all the masks and then used a stencil, that I had cut using the cloud die from the set, and stenciled the clouds using Whisper White Ink with a Sponge Dauber. I stamped the birds usilng Memento Tuxedo Black Ink.

I die cut two of the tall trees from the Majestic Mountain Dies out of Pear Pizzazz CS, and cut the deer out of Soft Suede CS using a die from the Snow Globe Scenic Dies.  They were attached with Tape Runner.

Lastly I attached the top mat to the bottom mat and then the finished piece to a White Card Base using Tape Runner.

Sunday, January 19, 2020

This A2 size card features the Mountain Air Stamp Set and coordinating Majestic Mountain Dies from Stampin' Up!.

Link to My Stampin' Up! Store

The top mat for this card was cut from Whisper White CS.

The bottom mat was cut from Dapper Denim CS.

The mountains and trees from the Mountain Air Stamp Set were stamped with Tranquil Tide Ink, moving the stamps to the right or left as I went down the card front.
I used  a Blending Brush with Tranquil Tide Ink to color the mountains.

I stamped over the tree sections with Whisper White Ink.

The "water" at the bottom was colored using a Blending Brush and Marina Mist Ink.

The "sky" at the top was colored using Blending Brushes and Pool Party and Tranquil Tide Inks.

I cut a stencil using the cloud die from the coordinating Majestic Mountain Dies out of some scrap cardstock and used a Sponge Dauber and Whisper White ink for the clouds.

The  birds were stamped using Memento Black Ink and are from the Mountain Air and Sailing Home stamp sets.

The boats are from the Sailing Home Stamp Set and were stamped with Tranquil Tide Ink on Whisper White CS.  They were colored with Pretty Peacock, Seaside Spray, and Crumb Cake Stampin' Blend Sets.

I attached the top mat to the bottom mat and then to a White Card Base using Tape Runner.
he boats were popped up with Dimensionals.

Saturday, January 18, 2020

This A2 size card features the Mountain Air Stamp Set and coordinating Majestic Mountain Dies from Stampin' Up!

Link to My Stampin' Up! Store

My top mat was cut from Seaside Spray CS.
My bottom mat was cut from Basic Black CS.

I stamped the mountain outlines with Night of Navy ink using the top side of the mountain stamp from the Mountain Air Stamp Set.  I moved the stamp down and over a bit and stamped another row of mountains, and then repeated that process and stamped again.

Next I flipped the mountain stamp over and stamped several times with Whisper White ink, again moving the stamp position down and to the side a couple times.

And then repeated the above process with Blueberry Bushel ink.

Next I stamped the trees with Mossy Meadow ink using the top side of the tree stamp once.  And then flipped the stamp over and stamped again.  They look dark because I stamped them on top of the lower edge of the mountains.

I used a Blending Brush with Blueberry Bushel Ink to even out the color of the mountains, and then did the same with Mossy Meadow Ink to color the lower section of the card.

I stamped the clouds with Whisper White Ink and the birds with Memento Tuxedo Black Ink.

I used the tree dies from the Majestic Mountain Dies to cut 2 sets of trees from Mossy Meadow CS and attached them with Tape Runner.

I cut the bears from Basic Black CS using the bear dies from the Still Scenes Dies and popped them up with Dimensionals.

The top mat was attached to the bottom mat and then the finished piece to a White Card Base.

Friday, January 17, 2020

These two A2 size cards feature the Daisy Lane Stamp Set and Daisy Punch from Stampin' Up!

Link to My Stampin' Up! Store

I started this card by stamping two of the large Daisies from the Daisy Lane Stamp Set on Whisper White CS using Highland Heather Ink, and assembled the daisy with a drop of Tombow Glue in the center.

Next I cut a piece of Whisper White Card stock using one of the Stitched Nested Labels Dies and stamped the fern from the Daisy Lane Stamp Set, the dot clusters from the Happy Birthday to You Stamp Set, and the "Thinking of You" sentiment from the Good Morning Magnolia Stamp Set, as shown, in Highland Heather Ink.

I cut and assembled the card pieces as follows from bottom to top:
1) Cut a bottom mat (5-1/4" x 4") out of  Highland Heather CS.
2) Cut a piece of Whisper White CS (5-1/4" x 3-3/8") and center it and attach it to the bottom mat with Tape Runner.
3) Cut a piece of coordinating DSP (5-1/4" x 3"), center it and attach it to the piece above with Tape Runner. (I used one of the Highland Heather pieces from the Regals 6x6 DSP set.)
4) Attach the stamped Stitched Nested Label cutout in the center of the above piece using Tape Runner.
5) Attach the above piece to a White Card Base using Tape Runner.
6) Pop up the Daisy with a Dimensional, as shown.

Lastly to finish the card I attached a Clear Faceted Gem to the center of the Daisy and 3 Purple Posy Faceted Dots on the nested label die.


Here's another similar card made using Rich Razzleberry Inks and Papers.

Wednesday, January 15, 2020

Here are two more A2 size cards featuring the Daisy Lane Stamp Set and the Daisy Punch from Stampin' Up!.

Link to My Stampin' Up! Store

The bottom mat on this first card is cut from Gorgeous Grape CS.  The top mat is cut from Whisper White CS.

I started by stamping the 3 small daisies, placed as shown, directly onto the top mat with Gorgeous Grape Ink.

Then I stamped the small daisy (3 times) onto Post-It Note Tape and fussy cut them so that I could use them as masks to cover the daisies. Once they were in place I stamped the ferns using Tranquil Tide Ink (1st, 2nd and 3rd generation stamping) and then removed the masks.

I stamped 2 of the large daisies on Whisper White CS, cut them out with the Daisy Punch, and assemble the 2 layers with a drop of Tombow Glue in the center. The daisy was glued to the top mat with Tombow Glue.

I used the "dotted" stamp from the Happy Birthday to You Stamp Set to add some additional color to the mat, using Gorgeous Grape Ink.

The sentiment is from Daisy Lane and was stamped with Gorgeous Grape Ink.

I attached the top mat to the bottom mat and then to a White Card Base using Tape Runner.

Lastly I attached one of the Clear Faceted Gems to the center of the Daisy.


This 2nd card was created similarly.

The bottom mat is cut from Berry Burst CS.

I rotated the top mat 90 degrees for this card.

The daisies and dots and sentiment were all stamped with Berry Burst Ink.

The ferns were stamped with Shaded Spruce Ink.

Both of these cards were inspired by one I saw on Pinterest by Melissa Kerman.


Tuesday, January 14, 2020

Here a two more cards featuring the Daisy Lane Stamp Set and coordinating Daisy Punches from Stampin' Up!

Link to My Stampin' Up! Store

The top mat for this card was cut from Whisper White CS.

The bottom mat was cut from Shaded Spruce CS.

I began by stamping  2 large daisies using Rococo Rose Ink onto Powder Pink CS, and then 2 medium daisies using Rococo Rose Ink onto Rococo Rose CS, and assembled them using a dot of Tombow Glue in the center of each.

Next I placed a couple of circle die cuts in the positions where I planned to place my finished daisies, and stamped the fern stamp from the Daisy Lane Stamp Set using Shaded Spruce Ink as shown.

For added background color I stamped the sprig stamp from the Healing Hugs Stamp Set using Shaded Spruce Ink as shown.

This sentiment is from the Dragonfly Dreams Stamp Set, also stamped using Shaded Spruce Ink.

I popped up both the daisies using Dimensionals.  Then attached the top mat to the bottom mat and then the finished piece to a White Card Base using Tape Runner.

Lastly I added Clear Faceted Gems to the center of the daisies.


This second card was created similarly.

The bottom mat for this one was cut from Rococo Rose CS.

The large and medium size daisies were stamped in the opposite colors of cardstock from above.

I cut leaf sprigs, using the Sprig Punch, from Shaded Spruce CS and attached them with Tape Runner, instead of using the stamp from above.

This sentiment is from the Beautiful Bouquet Stamp Set and was stamped in Rococo Rose Ink.


Monday, January 13, 2020

Here's another A2 size card I made using the Daisy Lane Stamp Set and coordinating Daisy Punches from Stampin' Up!.

Link to My Stampin' Up! Store

Like the cards I posted yesterday, I used DSP for the top mat.  For this card it was cut from the Natures Poem DSP set.

The bottom mat is cut from Tranquil Tide CS.

I added to this card, a frame cut using the Heirloom Frame & Dies Set using Soft Sky CS.

The Daisies were stamped on Whisper White CS using Tranquil Tide Ink.  They were cut out using the two coordinating Daisy Punches, and then assemble with a drop of Tombow Glue in the centers. When attached they were all popped up with Dimensionals.

The leaves were cut from Tranquil Tide CS using the Leaf Punch and one of the dies from the Foliage Frame Framelits.  I used one of the styluses from the SU Take Your Pick Tool to crease the leaves that I had punched out, and added a bit of  Wink of Stella to them.

The sentiment is from the Good Morning Magnolia Stamp Set and was stamped on Whisper White CS using Tranquil Tide Ink and cut out using one of the ovals from the Stitched Shapes Framelits.

I attached all the other pieces as shown to the top mat, and then to the bottom mat, and then to a White Card Base using Tape Runner.

Sunday, January 12, 2020

These A2 size cards feature the Daisy Lane Stamp Set and coordinating Daisy Punches from Stampin' Up! on patterned Designer Series Paper.

Link to My Stampin' Up! Store

For this first card the top mat was cut from a piece of  purple DSP in the Botanical Butterfly Set.  The bottom mat is cut from Highland Heather CS.

The Daisies were stamped in Highland Heather Ink on Whisper White CS, cut out with the coordinating Daisy Punches and assembled with a dot of Tombow Glue.

I used 2 circles cut from Post-it Notes to mark the positions I planned to place the daisies and stamped the fern from the Daisy Lane Stamp Set onto the DSP using Mossy Meadow Ink around the circle shapes. Then I popped up the daisies using Dimensionals.

I cut out 4 leaf sprigs from Mossy Meadow CS with the Sprig Punch and attached them with Tape Runner as shown.

I attached the top mat to the bottom mat and then the completed piece to a White Card Base.

To finish off the card, I colored 2 Clear Faceted Gems using the Dark Highland Heather Stampin' Blend.  Give the ink some time to dry and then place them in the center of the daisies.

This second card is done similarly.

The DSP is from the same Botanical Butterfly DSP set.

The bottom mat and the leaf sprigs were cut from Granny Apple Green CS.

The daisies were stamped using Lemon Lime Twist Ink on Lemon Lime Twist CS.

I stamped the fern stamp using Lemon Lime Twist Ink - in hindsight I wished I had used Granny Apple Green Ink for a bit more contrast - maybe next time.

I colored the Faceted Gems with the dark Granny Apple Green Stampin' Blend.


The top mat for this third card is from the Color Theory DSP Set.

The bottom mat is cut from Dapper Denim DSP.

The daisies were stamped on Whisper White CS using Dapper Denim Ink.

The trim is Pacific Point Stitched Edge Ribbon.

The Clear Faceted Gems were colored with the Dark Night of Navy Stampin' Blend.

Saturday, January 11, 2020

I finally got to try Stampin' Up!'s Daisy Lane Stamp Set and the coordinating Daisy Punches this past week. It was one of my favorites in the 2019-2020 Annual Catalog.  I am planning to do a series of posts starting with this simple card today.

Link to My Stampin' Up! Store

The top mat on this A2 size card was cut from Whisper White CS.

The bottom mat was cut from Flirty Flamingo CS.

I stamped 6 of the smaller daisies on Whisper White CS using Flirty Flamingo Ink, punched them out using the Medium Daisy Punch and assembled them with a small dot of Tombow Glue in the centers.

Next I stamped the stem using Call Me Clover ink onto the bottom mat 3 times trying my best to connect them.  Wasn't perfect but it came out okay.

I used the dotted stamp from the Waterfront Stamp Set with Flirty Flamingo Ink to add some splashes of color, and then popped up the completed daisies with Dimensionals, as shown.

I attached a several coordinating Enamel Shapes and a triple bow made with some Flirty Flamingo Ribbon I had in my stash.

The top mat was attached to the bottom mat, and then the finished piece to a White Card Base using Tape Runner.

My next post will show you some daisy card using DSP for the top mat.

Wednesday, January 8, 2020

Here are  two more A2 size cards I made when my sister was up late last year, using the Best Catch Stamp Set and coordinating Catch of the Day Dies from Stampin' Up!.  Her grandson is an avid fisherman.

Link to My Stampin' Up! Store

For this first card the top mat was cut from Crumb Cake CS.  The bottom mat was cut from So Saffron CS.

I stamped various shapes from the Catch of the Day Stamp Set onto the top mat using Crumb Cake Ink to create a background.  Then I stamped one each of the fish, hat, hook, and fishing basket using Memento Tuxedo Black Ink on Whisper White CS.  They were all colored using the So Saffron and Crumb Cake Stampin' Blend sets.

The sentiment is from the same set and was stamped using Crumb Cake ink on Whisper White CS, and was layered onto a scalloped circle of  Soft Suede CS and was popped up with Dimensionals. Both pieces we cut using the Layering Circles Framelits Dies.

The fish was popped up onto an oval cut from So Saffron CS, which I layered onto a scalloped oval of Soft Suede CS, both of these pieces were cut using the Layering Oval Framelits Dies.

The hook and hat were attached to the top mat using Tape Runner, the basket was popped up with Dimensionals.

The finished top mat was attached to the bottom mat and then to a White Card Base using Tape Runner.

For this second card the fish and basket were stamped on Whisper White CS using Memento Tuxedo Black Ink and colored using Night of Navy and Smoky Slate Stampin' Blends. The basket was cut out with the coordinating Catch of the Day dies.

The sentiment was stamped using Smoky Slate Ink on Whisper White CS and layered onto an scalloped circle cut from Smoky Slate CS.  The dies were from the Layering Circle Framelits set.

The bottom mat was cut from Smoky Slate CS.  The top mat was cut from a piece of the Twinkle Twinkle DSP.

The basket and sentiment were popped up with Dimensionals.  The fish was cut using the square Stitched Shape Framelits and was attached to the top mat using Tape Runner.

The finished top mat was attached to the bottom mat and then to a White Card Base using Tape Runner.

I finished the card using a few sequins, as shown.

Friday, January 3, 2020

Here's another two A2 size cards featuring Good Morning Magnolia Stamp Set and the coordinating Magnolia Memory Dies from Stampin' Up!

Link to My Stampin' Up! Store


The top mat for this card was cut from Crumb Cake CS at 5-1/8"x4-1/8".  

After applying the Embossing Buddy to the mat, I stamped the 2 Magnolias, as shown, using Versamark Ink, sprinkled Gold Embossing Powder, tapped off any excess, and heated the embossing powder with my Heat Gun.  

I applied Whisper White Ink to all of the flower petals using an Aqua Painter.  I repeated several times.  When the white was solid enough I used a Sponge Dauber to apply the Seaside Spray Ink toward the center of the flower.

The  sentiment is from the same stamp set and was stamped with Soft Suede Ink onto Seaside Spray CS and cut out with one of the oval Stitched Shape Framelits, and them popped up in the center as shown using Dimensionals.

The top mat was applied to a 5-1/4"x4-1/4" piece of Seaside Spray CS, and then the 2 mats were attached to a White Card Base using Tape Runner.

I finished off the card front by adding 2 Self Adhesive Gold Sequins, as shown.

This card was CASEd from one I saw on Pinterest by Linda Dalke.


The standard size top mat for this card was cut from Soft Sea Foam CS.  

The standard size bottom mat was cut from Fresh Fig CS, And then run thru the Big Shot using the Tin Tile Embossing Folder.

I  heat embossed the magnolia for this card onto a piece of Vellum, using my Embossing Buddy, Versamark Ink, White Embossing Powder, and my Heat Gun.  Heat the powder slowly as Vellum can pucker as it's heated - if it does you can usually get it to flatten out by placing it between some heavy blocks,  books, stacks of cardstock or copy paper.

I applied Fresh Fig Ink to the flower and Always Artichoke Ink to the leaves on the back of the Magnolia piece with my Aqua Painters.  Repeat the process until you think you have enough color showing thru the front of the piece.

I attached the flower to the top at using lots of Glue Dots.   Then I added some Fresh Fig Ribbon toward the bottom of the card and a few Enamel Shapes, as shown.

This Sentiment is also from the Good Morning Magnolia Stamp Set and was stamped with Fresh Fig ink and cut out using one of the Layering Circles Framelits.

The mats were attached to each other and then to a White Card Base.

This card was inspired by one I saw on Pinterest.

Thursday, January 2, 2020

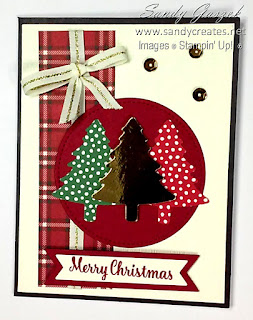
This A2 size card was made with the Pine Tree Punch from the Perfectly Plaid Bundle from Stampin' Up!

Link to My Stampin' Up! Store

I used the Pine Tree Punch to cut 3 trees from Gold Foil Paper and DSP. 

Next I cut a 3" circle using the one of the Stitched Shape Framelits Dies out of Cherry Cobbler Paper. I glued the two patterned trees to the circle as shown, the foil tree in the center was popped up with Dimensionals.

The bottom mat was cut from Very Vanilla CS and run through the Big Shot using the Subtle Embossing Folder.

I cut a 5"x1-1/2" piece from some red plaid DSP I had in my stash, and attached a piece of Gold Natural Trim Ribbon and a matching Bow to it.

The sentiment is from the Star of Light Stamp Set, it was stamped in Cherry Cobbler Ink on Very Vanilla CS, and cut out with one of the Merry Christmas Framelits Dies, the sentiment's frame was cut out of Cherry Cobbler CS.

Assemble the pieces as shown onto a Black Card Base and finish it off with a few Gold Sequins.

This card was CASEd from one I saw on Pinterest by Christina Barnes.

Wednesday, January 1, 2020

These A2 size cards feature the Merry Moose Stamp Set and coordinating Moose Punch from Stampin' Up!

Link to My Stampin' Up! Store

The top mat for this card is cut from Whisper White CS, the bottom mat is cut from Real Red CS and I used a White Card Base.

I used Mossy Meadow Ink to stamp several of the trees from the Merry Moose Stamp Set using 1st and 2nd & 3rd generation stamping, as shown.

Then I lightly shaded the bottom 3rd of the top mat using Crumb Cake Ink, the top 2/3rds of the mat using Balmy Blue Ink.

I stamped the moose's "tracks in the snow" using the stamp from the same stamp set with Crumb Cake Ink.

I stamped the Moose on a scrap of Whisper White CS using Crumb Cake Ink, colored it with the Crumb Cake set of Stampin' Blends, cut it out with the coordinating Moose Punch, and popped it up with Dimensionals as shown.

The sentiment is from the same stamp set and was stamped with Real Red Ink.

The top mat was attached to the Real Red bottom mat and then the completed piece to the White Card Base using Tape Runner.

Lastly I added a Gold Metallic Enamel Shape Star to the top of one of the trees.

This card was inspired by one I saw on Pinterest made by Nancy Gleason.

I stamped the pine trees from the Merry Moose Stamp Set, as shown, on a piece of Whisper White CS using Tranquil Tide Ink. I cut it to size using one of the Stitched Nested Dies. The Moose Tracks were stamped using Crumb Cake Ink.

Then I stamped the Moose using Crumb Cake Ink, colored it with the Crumb Cake Stampin' Blends set, and cut it out with the coordinating Moose Punch.

The scarf from the same set was stamped in Real Red Ink, fussy cut, and glued to the moose.

The sentiment is from the same set and was stamped as shown in Real Red Ink.

The completed moose was popped up onto the background with Dimensionals.

I made the bottom mat from Tranquil Tide CS & a piece of Wrapped In Plaid DSP.  I used a piece of Gold Edged Ribbon to cover the seam.

The moose panel was popped up onto the bottom mat using Dimensionals and then attached to the White Card Base using Tape Runner.

This card was CASEd by one I saw on Pinterest by Amy Koenders.