Wednesday, September 19, 2018

This is a really easy Birthday Card to make and features the Lovely As a Tree set from Stampin' Up!.  I used sponge daubers to apply the blue and green background, stamped the trees, deer and sentiments, mounted on to a card base and was done. 

Material List:
-Stamp Set:  Lovely As a Tree, (Deer)Hero Arts Winter Scene
-Sentiment Stamp Set:  Best Birds
-Dies: None
-Inks: Pear Pizzazz, Old Olive, Pool Party, Chocolate Chip*
-Cardstock: Mossy Meadow, Whisper White
--Card Base:  Whisper White A2 Card (Folded Size 5-1/2" x 4-1/4")
--Mossy Meadow Bottom Base Mat:  (5-1/4" x 4")
--Whisper White Top Mat:  (5" x 3-3/4")
-Other: Sponge Daubers
-Basics: Paper Trimmer, Adhesive Tape Runner, Tombow Glue,   Dimensionals, Mini Glue Dots, Scissors,  Big Shot

Directions:
--Cut all Cardstock pieces per list.
--Color the background of the Whisper White mat using Pool Party for the sky and a combination of   Pear Pizzazz & Old Olive for the grass using sponge daubers.
--Then stamp the sentiment and trees and deer with Chocolate Chip
--Attach White Mat to Mossy Meadow Bottom Mat & then both to the Card Base using tape runner.

Tuesday, September 18, 2018

Finally getting around to doing some alternative cards for the July 2018 Paper Pumpkin Picnic Paradise. Many of these cards were inspired by cards that I saw either on Pinterest or the Paper Pumpkin Fan Club on Facebook.  The bright colors in this kit are great for summer cards. 


Here are a few more alternatives:


Sunday, September 16, 2018

Here's another card using the Brusho Crystal Colours from Stampin' Up!, combined with the tree stamps in their Winter Woods stamp set.  I used the Prussian Blue and Moss Green crystals to color the whole top watercolor mat.  Then when dry heat emboss the trees and sentiment with white embossing powder.  This is an A7 size card.

Material List:
-Stamp Set: Winter Woods
-Sentiment Stamp Set:   Timeless Tidings
-Dies:  None
-Inks:  Versamark
-Brusho Crystal Colours: Prussian Blue, Moss Green
-Cardstock: Granny Apple Green, Watercolor, Whisper Whit
-Card Base:  Whisper White A7 card (Folded Size 5"  x 7" )
-Granny Apple Green Bottom Base Mat: (4-3/4" x 6-3/4") Optional- Trim to (4-1/2"  x 6-1/2" ) see note in directions.
-Watercolor Paper Top Mat:   (4-1/2"  x 6 -1/2" ) Optional-Trim to (4"x 6") see note in directions.
-Embellishments:  Tsukineko Sheer Shimmer Spray*
-Other:  White Embossing Powder, Embossing Buddy, Heat Tool, Stampin' Spritzer
-Basics: Paper Trimmer, Adhesive Tape Runner, Tombow Glue,   Dimensionals, Mini Glue Dots, Scissors,  Big Shot

Directions:
--Cut all Cardstock pieces per list.
--Use a Stampin' Spritzer filled with Water & spray the Watercolor paper.
--Sprinkle the Brusho Colours onto the Watercolor Paper. I used more blue than green - you need to experiment to find what looks right for you.  Spritz more water if need for all the crystals to dissolve and you can add more crystals as well if desired.
--The mat needs to be set aside to completely dry or you can use the Heat Tool to speed up the process.

--When dry,  you can do the heat embossing.  First dust the card with powder from the Embossing Buddy, then stamp the trees and sentiment in Versamark ink.
--Sprinkle on the White embossing powder. Then use the Heat Tool to melt the embossing powder.  Let it cool.
--Optional - Then I trimmed the watercolor mat to 4"x6" as sometimes the edges of the card fray from all the water. Trimmed the GAG mat as well to 4-1/2"-6/1/2".
--Optional - I sprayed the top mat with Shimmer Spray* to give the card some sparkle and shine.  Let it dry completely.

--Attach Watercolor Mat to Granny Apple Green Bottom Mat & then both to the Card Base using tape runner.

Saturday, September 15, 2018

This card features the Rose Wonder stamp set from Stampin' Up!, colored with Brusho Crystal Colour.   I bought the Brusho Crystals several months ago from Stampin' Up! but just got around to using them and love the results.  I heat embossed the flower design, added water & sprinkled the crystals. I used Aqua Painters to spread the colors across the card front.  This is an A7 size card.

Material List:
-Stamp Set: Rose Wonder
-Sentiment Stamp Set:  none*
-Dies: none
-Inks: Versamark, Brusho Crystals Moss Green & Prussian Blue

-Cardstock:  Dapper Denim, Whisper White, Watercolor Paper
-Card Base:  Whisper White A7 card (Folded Size 5"  x 7" )
-Dapper Denim Bottom Base Mat:  (4-3/4"  x 6-3/4" )
-Watercolor Paper Top Mat:   (4-1/2"  x 6-1/2" )
-Other: Gold Embossing Powder, Embossing Buddy & Heat Tool, Aqua Painter
-Basics: Paper Trimmer, Adhesive Tape Runner, Tombow Glue,   Dimensionals, Mini Glue Dots, Scissors,  Big Shot

Directions:
--Cut all pieces per list.
--Dust the Watercolor Paper top mat with Embossing Buddy powder and stamp the flower From Rose Wonder with Versamark ink.

--Apply Gold embossing powder, shake off excess & heat with Heat Tool to melt powder.
--Apply water to the card.
--Sprinkle the Prussian Blue crystals on the flower petals, and the Moss Green crystals on the leaves.
--Use Aqua Painter to spread the water onto the flower and leaves and then also onto the rest of the card.  You can add more color or water if needed until you get the desired effect.
--When done you need to let the card dry completely ( can use heat tool if you want to speed up the drying time).
--When dry attach Top Mat to Dapper Denim Bottom Mat & then both to the Card Base using tape runner.

Friday, September 14, 2018

This Christmas card features the Winter Woods Bundle in the 2018 Holiday catalog from Stampin' Up!.  The card background is sponged with a combo of Pool Party and Balmy Blue inks nd then stamped with trees.  The sentiment and pine tree were stamped with Shaded Spruce ink and then the tree was die cut.  The card was finished by covering all with "snow".   This is an A2 size card.

Material List:
-Stamp Set: Winter Woods, Dotted Stamp for Snow*
-Sentiment Stamp Set:  Timeless Tidings
-Dies:  In the Woods Framelits
-Inks: Shaded Spruce, Pool Party, Balmy Blue, Soft Suede, Versamark
-Cardstock: Shaded Spruce, Whisper White
-Card Base:  Whisper White A2 Card (Folded Size 5-1/2" x 4-1/4")
-Shaded Spruce Bottom Base Mat:  (5-1/4" x 4")
-Whisper White Top Mat:  (5" x 3-3/4")
-Scrap of Whisper White for the Pine Tree
-Other:  White Embossing Powder, Embossing Buddy, Heat Tool
-Basics: Paper Trimmer, Adhesive Tape Runner, Tombow Glue,   Dimensionals, Mini Glue Dots, Scissors,  Big Shot

Directions:
--Cut all pieces per list.
--Stamp the pine tree from Winter Woods with Shaded Spruce ink on scrap of Whisper White and die cut.
--Sponge the background of the WW top mat with a combination of Pool Party & Balmy Blue inks.
--Then stamp the WW mat with the tree set from Winter Woods with Soft Suede ink & the sentiment from Timeless Tidings with Shaded Spruce ink, as shown
--Apply powder from Embossing Buddy across card front.
-Stamp the "snow" using a dotted stamp* on the top mat & the Pine tree with Versamark ink.. (I also used a wavy stamp that I got in You Are My Anchor Paper Pumpkin kit on the tree - optional.)
--Apply White Embossing Powder and Use Heat Tool to melt the powder.
--Repeat the embossing process if you want additional snow or if you missed any spots.
--Attach White Mat to Shaded Spruce Bottom Mat & then both to the Card Base using tape runner.
--Pop-up the pine tree using dimensionals.

Wednesday, September 12, 2018

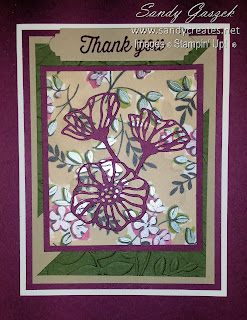
This Thank You card features the flower die cuts from Eclectic Layers Thinlits and the Share What You Love DSP from Stampin' Up!.  I used Rich Razzleberry, Mossy Meadow and Crumb Cake cardstock and ink to coordinate with the colors of the DSP.  This is an A2 size card.

Material List:
-Sentiment Stamp Set:  Eclectic Expressions
-Dies: Eclectic Layers Thinlits, Petals & More Thinlits
-Inks: Rich Razzleberry
-Cardstock: Mossy Meadows, Rich Razzleberry, Crumb Cake, Whisper White, Share What You Love DSP

-Card Base:  Whisper White A2 Card (Folded Size 5-1/2" x 4-1/4")
-Rich Razzleberry Bottom Base Mat:  (5-1/4" x 4")
-Crumb Cake Mat: (5' x 3-3/4")
-Mossy Meadow Mat: (3-1/2" square)
-Rich Razzleberry Upper Mat:  ( 3-3/4" x 3-1/4")
-SWYL DSP Top Mat: (3-1/2" x 3")
-Scraps of Rich Razzleberry for the flower die cuts.
-Scrap of Crumb Cat for the Sentiment
-Other:  Layered Leaves Embossing Folder
-Basics: Paper Trimmer, Adhesive Tape Runner, Tombow Glue,   Dimensionals, Mini Glue Dots, Scissors,  Big Shot

Directions:
-- Cut all mat pieces per list.
--Cut the Mossy Meadow mat diagonally.  Spritz with water & then use Layered Leaves embossing folder to emboss.
--Die cut the flower dies from scraps of Rich Razzleberry.
--Use glue to attach the flower pieces to the DSP top mat - trim stems on flowers to attach as shown.
--Attach all mats from the bottom to the top as shown onto the Whisper White Card Base using glue/tape runner.
--Stamp the scrap of Crumb Cake with Thank You sentiment from Eclectic Expressions.
--Die Cut the sentiment using the the die from Petals & More Thinlits.
--Pop-up the sentiment using dimensionals.
Thank You Card featuring Rooted in Nature Stamp Set & Nature's Poem DSP from Stampin' Up!. Tranquil Tide and Crumb Cake cardstock and ink.  This is an A2 size card.

This is an A2 Size card!

Material List:
-Stamp Set:  Rooted in Nature
-Sentiment Stamp Set:  Eclectic Expressions*
-Dies: Petals & More Thinlets
-Inks: Tranquil Tide, Versamark
-Cardstock:  Tranquil Tide, Crumb Cake, Whisper White, Natures Poem DSP ( Cut pieces per  measurements below)

-Whisper White Card Base:  A2 Card (Folded Size 5-1/2" x 4-1/4")
-Tranquil Tide Bottom Base Mat:  (5-1/4" x 4")
-Tranquil Tide Tree Mat: (3-3/4" x 2-1/4")
-Crumb Cake Mats:  1 (4" x 2-1/2"), 2 (2-1/2" square)
-DSP: 2 (2-3/8" square)
-Scrap of Crumb Cake to Stamp Sentiment
-Other: White Embossing Powder, Embossing Buddy, Heat Tool
-Basics: Paper Trimmer, Adhesive Tape Runner, Tombow Glue,   Dimensionals, Mini Glue Dots, Scissors,  Big Shot

Directions:
--Cut all pieces per list.
--Apply DSP square mats to Crumb Cake square mats with glue.
--Use Embossing Buddy to apply powder to the Tranquil Tide Tree Mat, stamp tree from Rooted in Nature in Versamark Ink.  Heat with Heat Tool to melt embossing powder.
--Attach Tree mat to Crumb Cake Mat.
--Attach all 3 mats above to Tranquil Tide Bottom Mat as shown using tape runner.
--Stamp the sentiment onto scrap piece of Crumb Cake with Tranquil Tide ink, die cut with die from Petals & More Thinlits.
--Pop-up the sentiment using dimensionals as shown.
--Attach TT Bottom Mat to the Card Base using tape runner.

Tuesday, September 11, 2018

This Thinking of You Card features the  Lovely as a Tree stamp set from Stampin' Up!.  The deer are from Nature Sings and the sentiment from Rooted in Nature stamps sets.  The background was sponged with Marina Mist, Pear Pizzazz and Old Olive inks. This is an A7 size card.  

Material List:
-Stamp Set:  Lovely As a Tree, Nature Sings
-Sentiment Stamp Set:  Rooted in Nature
-Dies: none
-Cardstock:  Marina Mist*, Whisper White
-Inks: Old Olive, Pear Pizzazz, Marina Mist*, Chocolate Chip*, Crumb Cake
-Stampin' Write Markers: Chocolate Chip
-Basics: Paper Trimmer, Adhesive Tape Runner, Tombow Glue,   Dimensionals, Mini Glue Dots, Scissors,  Big Shot
 
-Card Base:  Whisper White A2 Card (Folded Size 7" x 5")
-Marina Mist Bottom Base Mat:  (6-3/4"  x 4-3/4" )
-Whisper White Top Mat:  (6-1/2"  x 4-1/2" )

Directions:
--Cut the top and bottom mats to size per list.
--Stamp the Whisper White mat with the tree set from Lovely As a Tree - Lower Left with Chocolate Chop, Upper Right with Crumb Cake.
--Sponge the background - Old Olive and Pear Pizzazz inks for grass, Marina Mist ink* for sky.
--Stamp the Deer from Nature Sings with Chocolate Chip ink* and color with Choc. Chip marker.
--Stamp the sentiment  from Rooted in Nature with Chocolate Chip ink.
--Attach White Mat to Marina Mist Bottom Mat & then both to the Card Base using tape runner.

Monday, September 10, 2018

This Celebrate Card features the Celebrate You Thinlits from Stampin' Up!.  And is probably the quickest and easiest card I have ever made.  You simply stamp the flowers, die cut the 3 word dies, attach everything to the mats and you are done. 

Material List:
This is an A7 Size card!
-Stamp Set:  Amazing You*
-Dies: Celebrate You
-Cardstock:  Bermuda Bay, Whisper White
-Inks:  Pool Party

-Basics: Paper Trimmer, Adhesive Tape Runner, Tombow Glue,   Dimensionals, Mini Glue Dots, Scissors,  Big Shot
 
-Card Base:  Whisper White A2 Card (Folded Size 7" x 5")
-Bermuda Bay Bottom Base Mat:  (6-3/4"  x 4-3/4" )
-Whisper White Top Mat:  (6-1/2"  x 4-1/2" )

Directions:
--Cut the top and bottom mats to size per list.
--Stamp the Whisper White mat with the flower stamp from Amazing You with Pool Party Ink.*
--Die Cut the 3 sentiments from the Celebrate You Thinlets
--Glue the dies onto the stamped white mat as indicated.
--Attach White Mat to Bermuda Bay Bottom Mat & then both to the Card Base using tape runner.

Sunday, September 9, 2018

This Thinking of You card features the Love What You Do stamp set and coordinating DSP from the Share What You Do Suite of products from Stampin' Up!.  The suite also offer offers coordinating pearls, ribbon, and other embellishments.  This is an A2 size card.

Material List:
-Stamp Set: Love What You Do
-Sentiment Stamp Set:  Sheltering Tree
-Cardstock:  Share What You Love DSP, Old Olive, Mossy Meadow, Grapefruit Grove, Whisper White
-Inks:  Grapefruit Grove
-Other: Petal Burst Embossing folder*
-Basics: Paper Trimmer, Adhesive Tape Runner, Tombow Glue,   Dimensionals, Mini Glue Dots, Scissors,  Big Shot
 
-Card Base:  Whisper White A2 Card (Folded Size 5-1/2" x 4-1/4")
-Old Olive Bottom Base Mat:  (5-1/4" x 4")
-DSP Mat: (5" x 3-3/4")
-Mossy Meadow Embossed Mat: (3-1/2" square) cut diagonally
-Grapefruit Grove Mat: (3-3/4" x 3-1/4")
-Whisper White Top Mat:  (3-1/2" x 3")

Directions:
--Cut all mats/pieces to size per list.
--Cut the Mossy Meadow mat in half diagonally & emboss with Petal Burst embossing folder*.
--Stamp the Whisper White mat with the background stamp and flower from LWYD in Grapefruit Grove ink.
--Stamp the sentiment from Sheltering Tree in Grapefruit Grove ink.
--Attach Old Olive, DSP & Mossy Meadow mats from bottom to top to the WW card base as shown using tape runner.
--Attach the WW stamped mat onto the Grapefruit Grove mat. And pop-up using dimensionals.

*For more definition spritz your paper with water before embossing.

Saturday, September 8, 2018

This Holiday Card features my 2 favorite stamp sets from the new 2018 Holiday catalog from Stampin' Up!, Winter Woods and Dashing Deer.   I used Coastal Cabana and Balmy Blue for the background stamping and several shades of green for the trees.  This is an A7 size card.

Material List:
-Stamp Set:  Winter Woods, Dashing Deer
-Sentiment Stamp Set:  Winter Woods
-Dies: none
-Cardstock:  Tranquil Tide, Whisper White
-Inks: Coastal Cabana, Balmy Blue, Smoky Slate, Soft Suede
-Stampin' Write Markers:  Pear Pizzazz, Garden Green, Old Olive, Tranquil Tide
-Other:  Stamparatus, Tsukineko Shimmer Spritz Spray*
-Basics: Paper Trimmer, Adhesive Tape Runner, Tombow Glue,   Dimensionals, Mini Glue Dots, Scissors,  Big Shot

-Card Base:  Whisper White A7 card (Folded Size 7"  x 5" )
-Tranquil Tide  Bottom Base Mat:  (6-3/4"  x 4-3/4" )
-Whisper White Top Mat:   (6-1/2"  x 4-1/2" )

Directions:
--Cut the top and bottom mats to size per list.
--Stamp the Trees on the card (one at a time) as shown using the Stamparatus. (I used markers to color the stamp in various greens and continued adding colors until I got a dimensional look that I liked).
--Use Sponge Daubers to color the background on the Whisper White mat.  (First I colored the whole mat with the Coastal Cabana, then I used a hand torn mask and Smoky Slate ink to make the lines in the bottom half.  Next I used Balmy Blue ink on the upper section for the sky.)
--
Stamp the 2 deer from Dashing Deer & the sentiment from Winter Woods in Soft Suede ink.
--Give the card a few minutes to completely dry & then spray the whole card with Shimmer Spray.
--Attach White Mat to Tranquil Tide Bottom Mat & then both to the Card Base using tape runner.
Friday, September 7, 2018

Another Fall card.  This time featuring Sheltering Tree and Winter Woods stamp sets from Stampin' Up!.   I used Balmy Blue for the sky and Pear Pizzazz & Garden Green for the lawn.  Leaves are a combination of yellows, greens, and orange. This is an A2 size card.

Material List:
-Stamp Set:  Winter Woods, Sheltering Tree
-Sentiment Stamp Set:  Sheltering Tree
-Dies: none
-Cardstock:  Garden Green, Whisper White
-Inks:  Balmy Blue, Pear Pizzazz, Garden Green, Pumpkin Pie, Old Olive, Cajun Craze, Daffodil Delight, Memento Tuxedo Black
-Other: Sponge Daubers
-Basics: Paper Trimmer, Adhesive Tape Runner, Tombow Glue,        -Dimensionals, Mini Glue Dots, Scissors
 
-Card Base:  Whisper White A2 Card (Folded Size 5-1/2" x 4-1/4")
-Garden Green Bottom Base Mat:  (5-1/4" x 4")
-Whisper White Top Mat:  (5" x 3-3/4")

Directions:
-- Cut the top and bottom mats to size per list.
--Color the background of the WW top mat using sponge daubers with Balmy Blue (sky) and Pear Pizzazz (lawn) inks.
--Stamp the cluster of trees from Winter Woods using Memento ink.
--Stamp from Sheltering Tree stamp set - the grass using Garden Green - the leaves using Pumpkin Pie, Old Olive, Cajun Craze & Daffodil Delight. The bike, rake and sentiment using Memento Black.
--Attach White Mat to Garden Green Bottom Mat & then both to the Card Base using tape runner.

Thursday, September 6, 2018

This Fall colored Wishing You All Best card features Blended Seasons from Stampin' Up!.   All of the stamping on the card was done using Versamark ink, then heat embossed with copper embossing powder.  The leaves were colored with Stampin' Blends. This is an A2 size card.

Material List:
-Stamp Set:  Blended Seasons
-Sentiment Stamp Set:  Blended Seasons
-Dies: None
-Cardstock:  Old Olive, Whisper White
-Inks:  Versamark
-Stampin' Blends:  Pumpkin Pie, Daffodil Delight,  Old Olive, Crumb Cake
-Other: Copper Embossing Powder, Embossing Buddy, Heat Tool
-Basics: Paper Trimmer, Adhesive Tape Runner, Tombow Glue,   Dimensionals, Mini Glue Dots, Scissors,  Big Shot
 
-Card Base:  Whisper White A2 Card (Folded Size 5-1/2" x 4-1/4")
-Old Olive Bottom Base Mat:  (5-1/4" x 4")
-Whisper White Top Mat:  (5" x 3-3/4")

Directions:
-- Cut the top and bottom mats to size per list.
--Apply powder from Embossing Buddy across front of WW Mat.
--Stamp the Whisper White mat with Leaves Stamp  & Sentiment from Blended Seasons with Versamark ink as shown (fill in with partial stamping to cover more of the mat ).
--Sprinkle with Copper Embossing Powder
--Heat Set the embossing powder with Heat Tool
--Use Stampin Blends to color all or some of the leaves as shown or desired.
--Attach White Mat to Old Olive Bottom Mat & then both to the Card Base using tape runner.

Wednesday, September 5, 2018

This Christmas Wishes card features one of the deer from the NEW Dashing Deer Bundle by Stampin' Up!  There are 4 different deer designs and they all have coordinating die cuts.  This one was cut from Gold Foil paper and mounted on mats of Under the Mistletoe DSP.  This is an A2 size card.

Material List:
-Sentiment Stamp Set:  Dashing Deer
-Dies: Detailed Deer Framelits, Petals & More Thinlits
-Cardstock: Old Olive, Under the Mistletoe DSP, Whisper White, Gold Foil
-Inks: Shaded Spruce
-Other:  Triple Banner Punch
-Basics: Paper Trimmer, Adhesive Tape Runner, Tombow Glue,   Dimensionals, Mini Glue Dots, Scissors,  Big Shot
 
-Card Base:  Whisper White A2 Card (Folded Size 5-1/2" x 4-1/4")
-Old Olive Bottom Base Mat:  (5-1/4" x 4")
-DSP Banner:  2" x 6"
-DSP Square: 3-1/2" x 3-1/2"

Directions:
--Cut the Old Olive bottom mat to size per list.
--Cut the 2 pieces of DSP
--Use Triple Banner Punch to cut the bottom of the banner - then trim to 5-1/4"
--Attach the 2 pieces of DSP to the bottom mat. as shown
--Stamp a scrap piece of WW with sentiment in Shaded Spruce ink.
--Die Cut the sentiment with die from Petals & More Framelits.
--Die Cut the Deer from a scrap of Gold Foil paper.
--Pop-up the Deer and the sentiment with dimensionals as shown.
--Attach Bottom Mat to the Card Base using tape runner.

Tuesday, September 4, 2018


This Thinking of You card features the Rooted in Nature Suite & Blended Season Bundle from Stampin' Up!.  It is a triple fold card, using a sheet of double sided Nature's Poem DSP and coordinating colors of Tranquil Tide & Cajun Craze.  This is an A2 size card.

Material List:
-Stamp Set: Rooted in Nature
-Sentiment Stamp Set:  Rotted in Nature, Blended Seasons
-Dies: Stitched Seasons Framelits
-Cardstock: Tranquil Tide, Cajun Craze, Nature's Poem DSP, Whisper White
-Inks:  Versamark, Cajun Craze
-Other:  Heat Tool, Embossing Buddy, White Embossing Powder, Tourmaline Embossing Powder*
-Basics: Paper Trimmer, Adhesive Tape Runner, Tombow Glue,   Dimensionals, Mini Glue Dots, Scissors,  Big Shot
 
-Card Base:  DSP Cut at (12" x 5-1/2") (Folded Size 5-1/2" x 4-1/4")
-Cajun Craze Bottom Base Mat:  (5-1/4" x 4")
-Whisper White Top Mat:  (5" x 3-3/4")

Directions:
--Cut the top and bottom mats to size per list.
--Stamp the Whisper White top mat with the circular tree stamp from Rooted in Nature in Cajun Craze ink. See 2nd picture.
--Apply powder from Embossing Buddy on WW mat & then stamp the Wishing You All the Best sentiment from Blended Seasons onto the tree stamp with Versamark Ink.
--Apply White embossing powder and melt with Heat Tool.
--Attach to Cajun Craze bottom mat with tape runner.
--Using Thinking of You stamp from Rooted in Nature - use same steps as above Use embossing buddy, Stamp with Versamark,  Apply Tourmaline powder, and Melt with Heat Tool.
-Die Cut this Sentiment and a mat using Stitched Season Framelits.
--Glue 2 mats together.
--Cut a piece of the DSP for the card Base (12" x 5-1/2")
--Score at 2", 4", 8" & 10"
--Cut a diagonal from lower left corner up to the 4" score mark.
--Cut  diagonal from lower right corner to the 8" score mark.
--Fold at score lines.
--Attach the Cajun Craze mat to center section inside using Tape Runner.
--Take the pieces that you cut off & cut at score lines, trim them to fit onto the card base as shown in 2nd picture below and glue.
 --Glue the sentiment mat onto the left side of the folded card front - applying glue only where the pieces meet.

*Recollections Tourmaline Embossing Powder used on this card was purchased at Michaels.

Monday, September 3, 2018

This Thank You card features the Lovely Floral Embossing Folder and Share What You Love DSP from Stampin' Up!.  Really easy card to make and this layout can be used with your choice of any embossing folder and DSP. This series of cards used So Saffron, Tranquil Tide, Rich Razzleberry & Grapefruit Grove for the background mats.  These are all A2 size cards.


Material List:
-Sentiment Stamp Set:  Eclectic Expressions*
-Dies: Stitched Labels Framelits
-Cardstock:  So Saffron,  Share What You Love DSP
-Inks:  Memento Tuxedo Black
-Embellishments:  Enamel Shapes, Scrap of Ribbon
-Other: Lovely Floral Embossing Folder
-Basics: Paper Trimmer, Adhesive Tape Runner, Tombow Glue,   Dimensionals, Mini Glue Dots, Scissors,  Big Shot
 
-Card Base:  Whisper White A2 Card (Folded Size 5-1/2" x 4-1/4")
-So Saffron Bottom Base Mat:  (5-1/4" x 4")
-DSP Top Mat:  (5" x 3-3/4")

Directions:
--Cut the top and bottom mats to size per list.
--Emboss the So Saffron bottom mat with the Lovely Floral Folder in the corner of the piece.
--Cut the DSP top mat diagonally (this will give you 2 pieces - use the other piece for a 2nd card - see other samples below).
--Attach the DSP to the bottom mat as shown.
--Stamp a scrap of So Saffron  with the sentiment using Memento Black Ink.
--Die Cut the sentiment with the die from Stitched Label Framelits.
--Thread the ribbon thru the label and attach where shown.  I used 2 glue dots on the back of the label to keep in place & scotch tape to attach the ribbon to the back of the mat.
--Attach an Enamel Shape in center of large flower on embossed CS.
--Attach SS Bottom Mat to the Card Base using tape runner.


Sunday, September 2, 2018

This simple Thank You card features a strip of Share What You Love DSP from Stampin' UP!.  For this one I used coordinating Mint Macaron & Tranquil Tide inks and papers.  The Mint Macaron was embossed with the Tufted Dynamic Textured Impressions Folder - though I must admit its hard to see that in this photo.  This is an A2 size card and was inspired by a layout I saw on Pinterest by Christy Fulk.

Material List:
-Sentiment Stamp Set:  Stitched All Around
-Dies: Stitched Labels Framelits, Layering Circles Framelits
-Cardstock:  Mint Macaron, Tranquil Tide, 2017-19 DSP, Share What You Love DSP, Whisper White
-Inks: Tranquil Tide
-Embellishments:  Metallic Pearls, Butterfly*
-Other: Tufted Dynamic Textured Impressions Embossing Folder
-Basics: Paper Trimmer, Adhesive Tape Runner, Tombow Glue,   Dimensionals, Mini Glue Dots, Scissors,  Big Shot
 
-Card Base:  Tranquil Tide A2 Card (Folded Size 5-1/2" x 4-1/4")
-Mint Macaron Bottom Base Mat:  (5-1/4" x 4")

Directions:
-- Cut the MM bottom mat to size per list.
--Emboss with Tufted Textured embossing folder.
--Cut a strip of SWYL DSP (2-1/4" x 5-1/4") & attach to bottom mat with tape runner.
-- Cut a strip of  2017-19 DSP in Tranquil Tide color (1/2" x 4") & attach to bottom mat as shown 1-1/4" up from bottom of Mint Macaron mat.
--Stamp a scrap piece of  Whisper White with Thank You circle sentiment using Tranquil Tide Ink. 
--Die cut with appropriately sized circle die from Layering Circles Framelits.
--Die Cut the circle mat from Stitched Layer Framelits from a scrap of Tranquil Tide CS.
--Glue 2 circles together & attach to mat as shown with dimensionals.
--Glue butterfly as shown*.
--Add Gold Metallic Pearls to butterfly body.
--Attach Mat to the Tranquil Tide Card Base using tape runner.

Saturday, September 1, 2018

Here is more of my alternatives for the Paper Pumpkin  August 2018 Blissful Blooms kit. 


Here's another Blended Seasons card I completed this week using the Blended Seasons Bundle from Stampin' Up!.  This card is a combination of Pool Party and Coastal Cabana papers and Stampin' Blends.  The Gold flowers/leaves were first heat embossed with Gold Embossing powder and then colored with a Gold Wink of Stella marker.  This is an A2 size card.

Material List:
-Stamp Set:  Blended Seasons, Labels to Love
-Sentiment Stamp Set:  Beautiful Bouquet
-Dies: Stitched Seasons Framelit
-Cardstock: Pool Party, Coastal Cabana, Brights 6x6 DSP, Whisper White
-Inks:  Versamark
-Stampin' Blends:  Pool Party
-Embellishments:  Gold Faceted Gems
-Other: Everyday Labels Punch, Heat Tool, Embossing Buddy, Gold Embossing Powder, Gold Wink of Stella*
-Basics: Paper Trimmer, Adhesive Tape Runner, Tombow Glue,   Dimensionals, Mini Glue Dots, Scissors,  Big Shot
 
-Card Base:  Whisper White A2 Card (Folded Size 5-1/2" x 4-1/4")
-Coastal Cabana Bottom Base Mat:  (5-1/4" x 4")
-Pool Party Top Mat:  (5" x 3-3/4")

Directions:
--Cut the top and bottom mats to size per list.
--Using the Medium frame from Stitched Seasons Framelit die cut a hole in the center of the Pool Party CS.
--Cut a piece of the Coastal Cabana from the Brights DSP to fit behind the opening and attach with tape runner.
--Attach Pool Party top mat to Coastal Cabana bottom mat with tape runner.
--Apply Embossing Buddy powder to a scrap of WW CS.
--Stamp WW CS with the large flower stamp from Blended Seasons & the label outline frame from Labels to Love using Versamark ink.
--Sprinkle Gold Embossing Powder on WW - remove excess.
--Heat with Heat Tool until the powder is completely melted.
--Use Everyday Label Punch to cut out the label.
--Fussy cut the flower.
--Use Gold Wink of Stella to outline all the flowers and to color all the leaves.
--Use Pool Party Stampin' Blends to color the inside of the flowers.
--Pop-up the sentiment and the flower using dimensionals as shown.
--Attach Mats to the Card Base using tape runner.
--Attach the Enamel Shapes.